Globals vs. Constants: The Database Connection String Showdown in a PHP World

In the PHP world, we often encounter the age-old debate: globals vs. constants. This discussion pops up in various contexts, and one common battleground is how we store configuration values, especially sensitive ones like database connection strings. Should we use a global variable like $dsn or a defined constant like MySQL_DSN? Let’s dive into this, focusing on the specific example of a Data Source Name (DSN) for database connections.

The Contenders:

Global Variable ($dsn): A global variable, in this case, $dsn = "mysql://user:password@serverip/dbname", is declared in a scope accessible throughout your application.

Defined Constant (MySQL_DSN): A constant, defined using define('MySQL_DSN','mysql://user:password@serverip/dbname'), also provides application-wide access to the value.

The Pros and Cons:

Analysis:

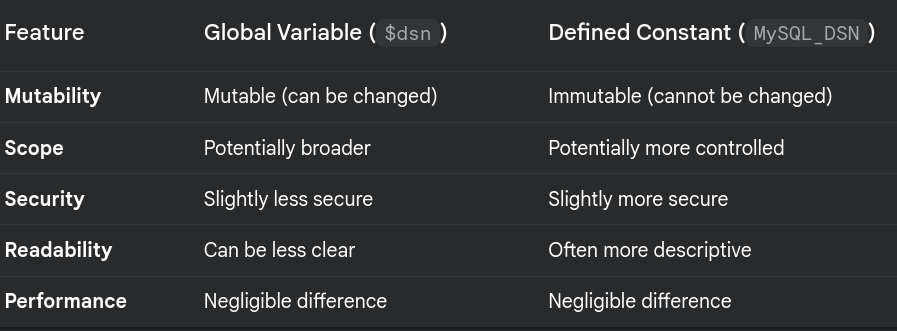
Mutability: Constants are immutable. Once defined, their value cannot be changed. This can be a significant advantage for security. Accidentally or maliciously modifying a database connection string mid-execution could have disastrous consequences. Globals, being mutable, are more vulnerable in this respect.

Scope: While both can be accessed globally, constants often encourage a more controlled approach. They are explicitly defined and their purpose is usually clearer. Globals, especially if used liberally, can lead to code that’s harder to reason about and maintain.

Security: The immutability of constants provides a slight security edge. It reduces the risk of the connection string being altered unintentionally or maliciously. However, neither approach inherently protects against all vulnerabilities (e.g., if your code is compromised). Proper input sanitization and secure coding practices are always essential.

Readability: Constants, by convention (using uppercase and descriptive names), tend to be more readable. MySQL_DSN clearly signals its purpose, whereas $dsn might require looking at its initialization to understand its role.

Performance: The performance difference between accessing a global variable and a defined constant is negligible in modern PHP. Don’t let performance be the deciding factor here.

Abstracting the MySQL Client Library:

Lets discuss about abstracting the MySQL client library. This is a fantastic idea, regardless of whether you choose globals or constants. Using an abstraction layer (often a class) allows you to easily switch between different database libraries (e.g., MySQLi, PDO) or even different connection methods without rewriting large portions of your application.

Here’s a basic example (using PDO, but the concept applies to other libraries):

class Database {
    private static $pdo;

    public static function getConnection() {
        if (!isset(self::$pdo)) {
            $dsn = defined('MySQL_DSN') ? MySQL_DSN : $GLOBALS['dsn']; // Check for constant first
            try {
                self::$pdo = new PDO($dsn);
                self::$pdo->setAttribute(PDO::ATTR_ERRMODE, PDO::ERRMODE_EXCEPTION); // Good practice!
            } catch (PDOException $e) {
                die("Database connection failed: " . $e->getMessage());
            }
        }
        return self::$pdo;
    }
}

// Usage:
$db = Database::getConnection();
$stmt = $db->query("SELECT  FROM users");
// ... process results ...

Recommendation:

Definable constants are generally the preferred approach for database connection strings. Their immutability and improved readability make them slightly more secure and maintainable. Combine this with a well-designed database abstraction layer, and you’ll have a robust and flexible system.

Further Considerations:

Environment Variables: Consider storing sensitive information like database credentials in environment variables and retrieving them in your PHP code for production environments. This is a more secure way to manage configuration.
Configuration Files: For more complex configurations, using configuration files (e.g., INI, YAML, JSON) can be a better approach.

Using separate boolean constants like MYSQL_ENABLED and PGSQL_ENABLED to control which database connection is active is a very good practice. It adds another layer of control and clarity. And, as you pointed out, the immutability of constants is a crucial advantage for configuration values.

Here’s how you could integrate that into the previous example, along with some improvements:

<?php

// Configuration (best practice: store these in environment variables or a separate config file)
define('MYSQL_ENABLED', getenv('MYSQL_ENABLED') ?: 0); // Use getenv() for environment variables, fallback to 0
define('MYSQL_DSN', getenv('MYSQL_DSN') ?: 'user:password@server/database');  // Fallback value for development
define('PGSQL_ENABLED', getenv('PGSQL_ENABLED') ?: 0);
define('PGSQL_DSN', getenv('PGSQL_DSN') ?: 'user:password@server/database');

class Database {
    private static $pdo;
    private static $activeConnection; // Track which connection is active

    public static function getConnection() {
        if (!isset(self::$pdo)) {
            if (MYSQL_ENABLED) {
                $dsn = MYSQL_DSN;
                $driver = 'mysql';  // Store the driver for later use
                self::$activeConnection = 'mysql';
            } elseif (PGSQL_ENABLED) {
                $dsn = PGSQL_DSN;
                $driver = 'pgsql';
                self::$activeConnection = 'pgsql';
            } else {
                die("No database connection enabled."); // Handle the case where no connection is configured.
            }

            try {
                self::$pdo = new PDO($driver.':'.$dsn); // Include the driver in the DSN string.
                self::$pdo->setAttribute(PDO::ATTR_ERRMODE, PDO::ERRMODE_EXCEPTION);
                // More PDO settings if needed (e.g., charset)
            } catch (PDOException $e) {
                die("Database connection failed: " . $e->getMessage());
            }
        }
        return self::$pdo;
    }

    public static function getActiveConnection() {  // Added a method to get the active connection type
        return self::$activeConnection;
    }
}


// Example usage:
$db = Database::getConnection();

if (Database::getActiveConnection() === 'mysql') {
    // MySQL specific operations
    $stmt = $db->query("SELECT  FROM users");
} elseif (Database::getActiveConnection() === 'pgsql') {
    // PostgreSQL specific operations
    $stmt = $db->query("SELECT  FROM users"); // Example: Adapt query if needed.
}

// ... process results ...

?>

Analyzing the above code snippet, there are few key improvements:

Environment Variables: Using getenv() is the recommended approach for storing sensitive configuration. The fallback values are useful for development but should never be used in production.
Driver in DSN: Including the database driver (mysql, pgsql, etc.) in the DSN string ($driver.':'.$dsn) is generally the preferred way to construct the DSN for PDO. It makes the connection more explicit.
Active Connection Tracking: The $activeConnection property and getActiveConnection() method allow you to easily determine which database type is currently being used, which can be helpful for conditional logic.
Error Handling: The die() statement now provides a more informative message if no database connection is enabled. You could replace this with more sophisticated error handling (e.g., logging, exceptions) in a production environment.
Clearer Configuration: The boolean constants make it very clear which database connections are enabled.

Using a .env file (or similar mechanism) combined with environment variable sourcing is a fantastic way to manage different environments (development, testing, staging, production) on a single machine or AWS EC2 instance. It drastically reduces the risk of accidental configuration errors and simplifies deployment process.

Here’s a breakdown of why this approach is so effective:

Benefits of .env files and Environment Variable Sourcing:

Separation of Concerns: Configuration values are separated from your application code. This makes your code more portable and easier to maintain. You can change configurations without modifying the code itself.
Environment-Specific Settings: Each environment (dev, test, prod) can have its own .env file with specific settings. This allows you to easily switch between environments without manually changing configuration values in your code.
Security: Sensitive information (API keys, database passwords, etc.) is not stored directly in your codebase. This is a significant security improvement.
Simplified Deployment: When deploying to a new environment, you just need to copy the appropriate .env file to the server and source it. No need to modify your application code.
Reduced Administrative Errors: By automating the process of setting environment variables, you minimize the risk of human error. No more manually editing configuration files on the server.
Version Control: You can exclude the .env file from version control (using .gitignore) to prevent sensitive information from being accidentally committed to your repository. However, it’s a good practice to include a .env.example file with placeholder values for developers to use as a template.

How it Works:

  1. .env File: You create a .env file in the root directory of your project. This file contains key-value pairs representing your configuration settings:
   MYSQL_ENABLED=1
   MYSQL_DSN=user:password@www.jijutm.com/database_name
   API_KEY=your_secret_api_key
   DEBUG_MODE=true
  1. Sourcing the .env file: You need a way to load the variables from the .env file into the server’s environment. There are several ways to do this: source .env (Bash): In a development or testing environment, you can simply run source .env in your terminal before running your PHP scripts. This will load the variables into the current shell’s environment. dotenv Library (PHP): For production environments, using a library like vlucas/phpdotenv is recommended. This library allows you to load the .env file programmatically in your PHP code: <?php require_once __DIR__ . '/vendor/autoload.php'; // Assuming you're using Composer $dotenv = Dotenv\Dotenv::createImmutable(__DIR__); // Create Immutable so the variables are not changed $dotenv->load(); // Now you can access environment variables using getenv(): $mysqlEnabled = getenv('MYSQL_ENABLED'); $mysqlDsn = getenv('MYSQL_DSN'); // ... ?> Web Server Configuration: Some web servers (like Apache or Nginx) allow you to set environment variables directly in their configuration files. This is also a good option for production.
  2. Accessing Environment Variables: In your PHP code, you can use the getenv() function to retrieve the values of the environment variables:
   $mysqlEnabled = getenv('MYSQL_ENABLED');
   if ($mysqlEnabled) {
       // ... connect to MySQL ...
   }

Example Workflow:

  1. Development: Developer creates a .env file with their local settings and runs source .env before running the application.
  2. Testing: A .env.testing file is created with the testing environment’s settings. The testing script sources this file before running tests.
  3. Production: The production server has a .env file with the production settings. The web server or a deployment script sources this file when the application is deployed.

By following this approach, you can create a smooth and efficient workflow for managing your application’s configuration across different environments. It’s a best practice that significantly improves the maintainability and security of your PHP applications.

AWS DynamoDB bulk migration between regions was a real pain.

Go and try searching for “migrate 20 dynamodb tables from singapore to Mumbai” on google and sure that you will get mostly migrating between accounts. But the real pain is that even though the documents say that full backup and restore is possible, the table has to be created with all the inherent configurations and when number of tables increases like 10 to 50 it becomes a real headache. I am attempting to automate this to the maximum extend possible using couple of shell scripts and a javascript code to rewrite exported json structure to that of a structure that can be taken by create option in the aws cli v2.

See the rest for real at the github repository

This post is Kept in Short and Simple format to transfer all importance to the github code release.

Conquering Time Limits: Speeding Up Dashcam Footage for Social Media with FFmpeg and PHP

Introduction:

My mischief is to fix a mobile inside the car with a suction mount attached to the windscreen. This mobile would capture video from start to finish of each trip. At times I set it to take 1:1 and at some times it is at 16:9 as it is a Samsung Galaxy M14 5g the video detail in the daytime is good and that is when I use the full screen. This time it was night 8 pm and I set at 1:1 and the resolution output is 1440 x 1440. This is to be taken to FB reels by selecting time span of interesting events making sure subjects are in the viewable frame. Alas, Facebook will take only 9:16 and a max of 30 seconds in the reels. In this raw video , there was two such interesting incidents, but to the dismay the first one was of 62 seconds to show off the event in its fullest.

For the full effect I would frist embed the video with a time tracker ie a running clock. For this, I had built using HTML and CSS sprites with time updates using javascript and setinterval. http://bz2.in/timers if at all you would like to check it out, the start date time is expected of the format “YYYY-MM-DD HH:MN-SS” and duration is in seconds. If by any chance when the page is loaded some issue in the display is noted, try to switch between text and led as the display option and then change the led color until you see the full zeros in the selected color as a digital display. Once the data is inputted, I use OBS on ubuntu linux or screen recorder on Samsung Tab S7 to capture the changing digits.

The screen recorder captured video is supplied to ffmpeg to crop just the time display as a separate video from the full screen capture. The frame does not change for each session. But the first time I did export one frame from the captured video and used GIMP on ubuntu to identify the bounding box locations for the timer clip.
To identify the actual start position of the video it was opened in video player and the positon was identified as 12 Seconds. Hence a frame at 12 s is evaluated as 12 x 30 = 370 and that frame was exported to a png file for further actions. I used the following command to export one frame.

ffmpeg -i '2025-02-04 19-21-30.mov' -vf "select=eq(n\,370)" -vframes 1 out.png

By opening this out.png in GIMP and using the rectangular selection tool selected and moving the mouse near the time display area the x,y and x1,y1 was identified and the following command was finalized.

ffmpeg -i '2025-02-04 19-21-30.mov' -ss 12 -t 30 -vf "crop=810:36:554:356" -q:v 0 -an timer.mp4

The skip (-ss 12) is identified manually by previewing the source file in the media player.

The relevant portion from the full raw video is also captured using ffmpeg as follows.

ffmpeg -i 20250203_201432.mp4 -ss 08:08 -t 62 -vf crop=810:1440:30:0 -an reels/20250203_201432_1.mp4

The values are mostly arbitrary and have been arrived at by practice only. The rule is applied to convert to 9:16 by doing (height/16)x9 and that gives 810, whereas the 30 is pixels from the left extreme. That is because I wanted the left side of the clip to be fully visible.

Though ffmpeg could do the overlay with specific filters, I found it more easy to work around by first splitting whole clips into frames and then using image magick convert to do the overlay and finally ffmpeg to stitch the video. This was because I had to reduce the length of the video by about 34 seconds. And this should happen only after the time tracker overlay is done. So the commands which I used are.

created few temporary folders

mkdir ff tt gg hh

ffmpeg -i clip.mp4 ff/%04d.png
ffmpeg -i timer.mp4 tt/%04d.png

cd ff

for i in *.png ; do echo $i; done > ../list.txt
cd ../

cat list.txt | while read fn; do convert ff/$fn tt/$fn -gravity North -composite gg/$fn; done

Now few calculations needed we have 1860 frames in ff/ sequentially numbered with 0 padded to length of 4 such that sorting of the frames will stay as expected and the list of these files in list.txt. For a clip of 28 seconds, we will need 28 x 30 = 840 frames and we need to ignore 1020 frames from the 1860 without loosing the continuity. For achieving this my favorite scripting language PHP was used.

<?php

/* 
this is to reduce length of reel to 
remove logically few frames and to 
rename the rest of the frames */

$list = @file('./list.txt');  // the list is sourced
$frames = count($list); // count of frames

$max = 28 * 30; // frames needed

$sc = floor($frames / $max);
$final = [];  // capture selected frames here
$i = 0;

$tr = floor($max * 0.2);  // this drift was arrived by trial estimation

foreach($list as $one){
  if($i < $sc){
     $i++;
  }else{
    $final[] = trim($one);
    $i = 0;
  }
  if(count($final) > $tr){
  	$sc = 1;
  }
}


foreach($final as $fn => $tocp){
   $nn = str_pad($fn, 4, '0', STR_PAD_LEFT) . '.png';
   echo $tocp,' ',$nn,"\n";
}

?>

The above code was run and the output was redirected to a file for further cli use.

php -q renf.php > trn.txt

cat trn.txt | while read src tgt ; do cp gg/$src hh/$tgt ; done

cd hh
ffmpeg -i %04d.png -r 30 ../20250203_201432_1_final.mp4

Now the reel is created. View it on facebook

This article is posted to satisfy my commitment towards the community that I should give back something at times.

Thankyou for checking this out.

Car Dash Cam to Facebook Reels – An interesting technology journey.

Well, it started to be a really interesting technology journey as I am a core and loyal Ubuntu Linux user. On top of that I always am on the lookout to sharpen my DevOps instincts and skillset. Some people do say that it is because that I am quite lazy to do repetitive tasks the manual way. I don’t care about these useless comments. The situation is that like all car dash cameras, this one also will record any activity in front or back of the car at a decent resolution of 1280 × 720 but as one file each 5 minute. The system’s inherent bug was that it won’t unmount the sdcard properly; hence, to get the files, it need to be mounted on a Linux USB sdcard reader. The commands that I used to combine and overlay these files were combined and formatted into a shell script as follows:

#!/bin/bash

 find ./1 -type f -size +0 | sort > ./fc.txt
 sed -i -e 's#./#file #' ./fc.txt 

 find ./2 -type f -size +0 | sort > ./bc.txt
 sed -i -e 's#./#file #' ./bc.txt 
 
 ffmpeg -f concat -safe 0 -i ./bc.txt -filter:v "crop=640:320:0:0,hflip"  bc.mp4
ffmpeg -f concat -safe 0 -i ./fc.txt -codec copy -an  fc.mp4

ffmpeg -i fc.mp4 -i bc.mp4 -filter_complex "[1:v]scale=in_w:-2[over];[0:v][over]overlay=main_w-overlay_w-50:50" -c:v libx264 "combined.mp4"

To explain the above shell script, the find (./1 and ./2) dash cam saves front cam files in “./1” and rear cam files in “./2” and the filters make sure only files with minimum size greater than 0 will be listed and as the filenames are timestamp based the sort will do its job. The sorted listing is written into fc.txt and then sed used to stamp each filename with a text “file” at the begening which is required for ffmpeg to combine a list of files. The lines 3 and 4 does the sequential combine of rear cam and front cam files and the final one resizes the rear cam file and inset over the front cam file at a calculated width from right side top offset of 50 pixels. This setup was working fine till recently when the car was parked for a long period in very hot area when the camera mount which was using a kind of suction to the windscreen failed and the camera came loose, destroying the touch screen and functionality. As I had already been hooked to the dashcam footage, I got a mobile mount and started using my Galaxy M14 mounted to the windscreen.

Now there is only one camera and that is the front one, but I start the recording before engaging gears from my garage and then stop it only after coming to a full halt at the destination. This is my policy and I don’t want to get distracted while driving. Getting a facebook reel of 9:16 and less than 30 seconds from this footage is not so tough as I need to crop only 405×720 but the frame start location in pixels as well as the timespan is critical. This part I am doing manually. Then it is just a matter of ffmpeg crop filter.

ffmpeg <input> -ss <start> -t <duration> -vf crop=405:720:600:0 -an <output>

In the above command, crop=width:height:x:y is the format and this was okay until the interesting subject was at a relative stable position. But sometimes ther subject will move from left to right and cropping has to happen in a pan motion. For this I chose the hard way.

  1. Crop the interesting portion of the video by timeline without resolution change.
  2. Split frames into png files ffmpeg <input> %04d.png as long as frames are less than 1000 (duration * 30) 4 should be okay if not the padding has to be increased.
  3. Create a pan frame configuration in a text file with framefile x y on each line.
  4. Use image magic convert by looping through the above file say pos.txt
cat pos.txt | while read fn x y ; do convert ff/$fn -crop 405x720+$x+$y gg/$fn

Once this is completed, then use the following command to create the cropped video with pan effect.

ffmpeg -i ff/%04d.png -r 30 cropped.mp4

Well by this weekend I had the urge to enhance it a bit more, with a running clock display along the top or bottom of every post-processed video. For the same after some thoughts I created an html page with some built in preference tweaks saving all such tweaks into localstore effectively avoiding any serverside database or the sort. I have been benefitted by the Free and Open Source movement, and I feel it is my commitment to provide back. Hence the code is hosted on AWS S3 website with no restriction. Check out the mock clock display and if interested view the source also.

With the above said html, a running clock display starting from a timestamp and runs for a supplied duration with selected background and foreground colors and font size etc is displayed on the browser. I capture this video using OBS on my laptop, builtin screen recorder on my Samsung Galaxy Tab S7 FE and then use ffmpeg to crop the exact time display from the full screen video. This video is also split into frames and corresponding frames overlayed on top of the reel clip frame also using convert and the pos.txt for the filenames.

cat pos.txt | while read fn x y ; do convert gg/$fn tt/$fn -gravity North -composite gt/$fn ; done

The gravity – “North” places the second input at the top of the first input whereas “South” will place at the bottom, similarly “East” and “West” and “Center” is also available.

Exploring Application Development on AWS Serverless

AWS Serverless architecture has transformed the way developers approach application development, enabling them to leverage multiple programming languages for optimal functionality. This article delves into the advantages of using AWS Serverless, particularly focusing on the flexibility of mixing languages like Node.js, Python, and Java, alongside the use of Lambda layers and shell runtimes for various functionalities.

The Advantages of AWS Serverless Architecture

  1. Cost Efficiency: AWS Serverless operates on a pay-as-you-go model, allowing businesses to only pay for the resources they consume. This eliminates waste during low-demand periods and ensures that costs are kept in check while scaling operations[3][5].
  2. Scalability: The automatic scaling capabilities of AWS Lambda mean that applications can handle varying workloads without manual intervention. This is particularly beneficial for applications with unpredictable traffic patterns, ensuring consistent performance under load[3][5].
  3. Operational Efficiency: By offloading infrastructure management to AWS, developers can focus on writing code rather than managing servers. This shift enhances productivity and allows for faster deployment cycles[5][7].
  4. Agility: The serverless model encourages rapid development and iteration, as developers can quickly deploy new features without worrying about the underlying infrastructure. This agility is crucial in today’s fast-paced development environment[3][4]. Mixing Development Languages for Enhanced Functionality

One of the standout features of AWS Serverless is its support for multiple programming languages. This allows teams to select the best language for specific tasks:

  • Node.js: Ideal for handling asynchronous operations, Node.js excels in scenarios requiring real-time processing, such as web applications or APIs. Its event-driven architecture makes it a perfect fit for serverless functions that need to respond rapidly to user interactions[2][4].
  • Python: Known for its simplicity and readability, Python is a great choice for data processing tasks, including image and video manipulation. Developers can utilize libraries like OpenCV or Pillow within Lambda functions to perform complex operations efficiently[1][2].
  • Java: For tasks involving PDF generation or document processing, Java stands out due to its robust libraries and frameworks. Leveraging Java in a serverless environment allows developers to tap into a vast pool of resources and expertise available in the freelance market[1][3]. Utilizing Lambda Layers and Shell Runtimes

AWS Lambda layers enable developers to package dependencies separately from their function code, promoting reusability and reducing deployment times. For instance:

  • Image/Video Processing: Binary helpers can be deployed in Lambda layers to handle specific tasks like image resizing or video encoding. This modular approach not only keeps functions lightweight but also simplifies maintenance[2][5].
  • Document Generation: Using shell runtimes within Lambda functions allows developers to execute scripts that generate documents on-the-fly. This is particularly useful when integrating with external services or databases to create dynamic content[1][3]. Decentralizing Business Logic

By allowing different teams or freelancers to work on various components of an application without needing full knowledge of the entire business logic, AWS Serverless fosters a more decentralized development approach. Each team can focus on their specific area of expertise—be it frontend development with Node.js or backend processing with Python or Java—thereby enhancing collaboration and speeding up the overall development process.

Conclusion

AWS Serverless architecture offers a powerful framework for modern application development by enabling flexibility through language diversity and efficient resource management. By leveraging tools like Lambda layers and shell runtimes, developers can create scalable, cost-effective solutions that meet the demands of today’s dynamic business environment. Embracing this approach not only enhances productivity but also opens up new avenues for innovation in application design and functionality.

In summary, AWS Serverless is not just a technological shift; it represents a paradigm change in how applications are built and maintained, allowing teams to focus on what truly matters—their core business logic and user experience.

Citations:
[1] https://www.xenonstack.com/blog/aws-serverless-computing/
[2] https://www.netguru.com/blog/aws-lambda-node-js
[3] https://dinocloud.co/aws-serverless-application-development-the-future-of-cloud-computing/
[4] https://www.techmagic.co/blog/aws-lambda-vs-google-cloud-functions-vs-azure-functions/
[5] https://www.cloudhesive.com/blog-posts/benefits-of-using-a-serverless-architecture/
[6] https://docs.aws.amazon.com/pdfs/serverless/latest/devguide/serverless-core.pdf
[7] https://newrelic.com/blog/best-practices/what-is-serverless-architecture
[8] https://dev.to/aws-builders/the-state-of-aws-serverless-development-h5a

Creating a Dynamic Image Animation with PHP, GIMP, and FFmpeg: A Step-by-Step Guide

Introduction

In this blog post, I’ll walk you through a personal project that combines creative image editing with scripting to produce an animated video. The goal was to take one image from each year of my life, crop and resize them, then animate them in a 3×3 grid. The result is a visually engaging reel targeted for Facebook, where the images gradually transition and resize into place, accompanied by a custom audio track.

This project uses a variety of tools, including GIMP, PHP, LibreOffice Calc, ImageMagick, Hydrogen Drum Machine, and FFmpeg. Let’s dive into the steps and see how all these tools come together.

Preparing the Images with GIMP

The first step was to select one image from each year that clearly showed my face. Using GIMP, I cropped each image to focus solely on the face and resized them all to a uniform size of 1126×1126 pixels.

I also added the year in the bottom-left corner and the Google Plus Code (location identifier) in the bottom-right corner of each image. To give the images a scrapbook-like feel, I applied a torn paper effect around the edges. Which was generated using Google Google Gemini using prompt “create an image of 3 irregular vertical white thin strips on a light blue background to be used as torn paper edges in colash” #promptengineering

Key actions in GIMP:

  • Crop and resize each image to the same dimensions.
  • Add text for the year and location.
  • Apply a torn paper frame effect for a creative touch.

Organizing the Data in LibreOffice Calc

Before proceeding with the animation, I needed to plan out the timing and positioning of each image. I used LibreOffice Calc to calculate:

  • Frame duration for each image (in relation to the total video duration).
  • The positions of each image in the final 3×3 grid.
  • Resizing and movement details for each image to transition smoothly from the bottom to its final position.

Once the calculations were done, I exported the data as a JSON file, which included:

  • The image filename.
  • Start and end positions.
  • Resizing parameters for each frame.

Automating the Frame Creation with PHP

Now came the fun part: using PHP to automate the image manipulation and generate the necessary shell commands for ImageMagick. The idea was to create each frame of the animation programmatically.

I wrote a PHP script that:

  1. Reads the JSON file and converts it to PHP arrays, which were manually hard-coded into the generator script. This is to define the positioning and resizing data.
  2. Generates ImageMagick shell commands to:
  • Place each image on a 1080×1920 blank canvas.
  • Resize each image gradually from 1126×1126 to 359×375 over several frames.
  • Move each image from the bottom of the canvas to its final position in the 3×3 grid.

Here’s a snippet of the PHP code that generates the shell command for each frame:

This script dynamically generates ImageMagick commands for each image in each frame. The resizing and movement of each image happens frame-by-frame, giving the animation its smooth, fluid transitions.


Step 4: Creating the Final Video with FFmpeg

Once the frames were ready, I used FFmpeg to compile them into a video. Here’s the command I referred, for the exact project the filnenames and paths were different.

ffmpeg -framerate 30 -i frames/img_%04d.png -i audio.mp3 -c:v libx264 -pix_fmt yuv420p -c:a aac final_video.mp4

This command:

  • Takes the image sequence (frames/img_0001.png, frames/img_0002.png, etc.) and combines them into a video.
  • Syncs the video with a custom audio track created in Hydrogen Drum Machine.
  • Exports the final result as final_video.mp4, ready for Facebook or any other platform.

Step 5: The Final Touch — The 3×3 Matrix Layout

The final frame of the video is particularly special. All nine images are arranged into a 3×3 grid, where each image gradually transitions from the bottom of the screen to its position in the matrix. Over the course of a few seconds, each image is resized from its initial large size to 359×375 pixels and placed in its final position in the grid.

This final effect gives the video a sense of closure and unity, pulling all the images together in one cohesive shot.

Conclusion

This project was a fun and fulfilling exercise in blending creative design with technical scripting. Using PHP, GIMP, ImageMagick, and FFmpeg, I was able to automate the creation of an animated video that showcases a timeline of my life through images. The transition from individual pictures to a 3×3 grid adds a dynamic visual effect, and the custom audio track gives the video a personalized touch.

If you’re looking to create something similar, or just want to learn how to automate image processing and video creation, this project is a great starting point. I hope this blog post inspires you to explore the creative possibilities of PHP and multimedia tools!

The PHP Script for Image Creation

Here’s the PHP script I used to automate the creation of the frames for the animation. Feel free to adapt and use it for your own projects:

<?php

// list of image files one for each year
$lst = ['2016.png','2017.png','2018.png','2019.png','2020.png','2021.png','2022.png','2023.png','2024.png'];

$wx = 1126; //initial width
$hx = 1176; //initial height

$wf = 359;  // final width
$hf = 375;  // final height

// final position for each year image
// mapped with the array index
$posx = [0,360,720,0,360,720,0,360,720];
$posy = [0,0,0,376,376,376,752,752,752];

// initial implant location x and y
$putx = 0;
$puty = 744;

// smooth transition frames for each file
// mapped with array index
$fc = [90,90,90,86,86,86,40,40,40];

// x and y movement for each image per frame
// mapped with array index
$fxm = [0,4,8,0,5,9,0,9,18];
$fym = [9,9,9,9,9,9,19,19,19];

// x and y scaling step per frame 
// for each image mapped with index
$fxsc = [9,9,9,9,9,9,20,20,20];
$fysc = [9,9,9,10,10,10,21,21,21];

// initialize the file naming with a sequential numbering

$serial = 0;

// start by copying the original blank frame to ramdisk
echo "cp frame.png /dev/shm/mystage.png","\n";

// loop through the year image list

foreach($lst as $i => $fn){
    // to echo the filename such that we know the progress
    echo "echo '$fn':\n"; 

    // filename padded with 0 to fixed width
    $newfile = 'frames/img_' . str_pad($serial, 4,'0',STR_PAD_LEFT) . '.png';

// create the first frame of an year
    echo "composite -geometry +".$putx."+".$puty."  $fn /dev/shm/mystage.png  $newfile", "\n";

    $tmx = $posx[$i] - $putx;

    $tmy = $puty - $posy[$i];

    // frame animation
    $maxframe = ($fc[$i] + 1);
    for($z = 1; $z < $maxframe ; $z++){

        // estimate new size 
        $nw = $wx - ($fxsc[$i] * $z );
        $nh = $hx - ($fysc[$i] * $z );

        $nw = ($wf > $nw) ? $wf : $nw;
        $nh = ($hf > $nh) ? $hf : $nh;

        $tmpfile = '/dev/shm/resized.png';
        echo "convert $fn  -resize ".$nw.'x'.$nh.'\!  ' . $tmpfile . "\n";

        $nx = $putx + ( $fxm[$i] * $z );
        $nx = ($nx > $posx[$i]) ? $posx[$i] : $nx; 

        if($posy[$i] > $puty){
            $ny = $puty + ($fym[$i] * $z) ;
            $ny = ($ny > $posy[$i]) ? $posy[$i] : $ny ;
        }else{
            $ny = $puty - ($fym[$i] * $z);
            $ny = ($posy[$i] > $ny) ? $posy[$i] : $ny ;
        }

        $serial += 1;
        $newfile = 'frames/img_' . str_pad($serial, 4,'0',STR_PAD_LEFT) . '.png';
        echo 'composite -geometry +'.$nx.'+'.$ny."  $tmpfile /dev/shm/mystage.png  $newfile", "\n";
    }

    // for next frame use last one
     // thus build the final matrix of 3 x 3
    echo "cp $newfile /dev/shm/mystage.png", "\n";
}

The Benefits of Adopting DevOps Practices for Software Development Startups

In today’s fast-paced technology landscape, startups need to stay agile, adaptive, and ahead of the competition. Software development startups, in particular, face the challenge of delivering high-quality products at speed, while simultaneously managing limited resources and dynamic market demands. Adopting DevOps practices—such as Continuous Integration (CI), Continuous Deployment (CD), and Infrastructure as Code (IaC)—can provide the necessary framework for startups to scale efficiently and maintain agility throughout their development lifecycle.

In this article, we’ll explore the key benefits of embracing these DevOps practices for startups and how they can lead to accelerated growth, improved product quality, and a competitive edge in the software development space.

Faster Time-to-Market

Startups often have limited time to bring products to market, as getting an early foothold can be critical for survival. DevOps practices, particularly Continuous Integration and Continuous Deployment, streamline development processes and shorten release cycles. With CI/CD pipelines, startups can automate the testing, building, and deployment of applications, significantly reducing manual efforts and human errors.

By automating these critical processes, teams can focus more on feature development, bug fixes, and customer feedback, resulting in faster iterations and product releases. This speed-to-market advantage is especially crucial in industries where innovation and timely updates can make or break the business.

Key Takeaway: Automating repetitive tasks through CI/CD accelerates product releases and provides a competitive edge.

Improved Collaboration and Communication

A core principle of DevOps is fostering collaboration between development and operations teams. In a startup environment, where roles often overlap and resources are shared, having clear communication and collaboration frameworks is vital for success. DevOps encourages a culture of shared responsibility, where both teams work toward common objectives such as seamless deployment, system stability, and continuous improvement.

With DevOps practices, cross-functional teams can break down silos, streamline processes, and use collaborative tools like version control systems (e.g., Git) to track changes, review code, and share feedback in real time.

Key Takeaway: DevOps fosters a culture of collaboration and transparency that unites teams toward common goals.

Scalability and Flexibility with Infrastructure as Code (IaC)

Infrastructure as Code (IaC) allows startups to manage infrastructure programmatically, meaning server configurations, networking setups, and database settings are defined in code rather than manually provisioned. This approach brings tremendous scalability and flexibility, particularly as startups grow and expand their user base.

With IaC, infrastructure can be easily replicated, modified, or destroyed, allowing startups to quickly adapt to changing market needs without the overhead of manual infrastructure management. Popular IaC tools like Terraform or AWS CloudFormation enable startups to automate infrastructure provisioning, minimize downtime, and ensure consistent environments across development, staging, and production.

Key Takeaway: IaC empowers startups to scale infrastructure effortlessly, ensuring consistency and minimizing manual intervention.

Enhanced Product Quality and Reliability

By integrating CI/CD and automated testing into their development workflows, startups can ensure a higher level of product quality and reliability. Automated tests run with every code change, enabling developers to catch bugs early in the development process before they make it to production.

Continuous integration ensures that code is regularly merged into a shared repository, reducing the likelihood of integration issues down the road. With Continuous Deployment, new features and updates are automatically pushed to production after passing automated tests, ensuring that customers always have access to the latest features and improvements.

For startups, this translates to higher customer satisfaction, reduced churn, and fewer critical bugs or performance issues in production.

Key Takeaway: Automated testing and continuous integration lead to more stable, reliable, and high-quality products.

Cost Efficiency

For startups with limited budgets, adopting DevOps practices is a smart way to optimize operational costs. Automating the deployment pipeline with CI/CD reduces the need for manual interventions, which minimizes the risk of costly errors. Similarly, IaC allows startups to implement infrastructure efficiently, often using cloud services such as AWS, Google Cloud, or Azure that support pay-as-you-go models.

This not only eliminates the need for expensive hardware or large operations teams but also allows startups to allocate resources dynamically based on demand, avoiding unnecessary spending on idle infrastructure.

Key Takeaway: DevOps reduces operational costs by leveraging automation and scalable cloud infrastructure.

Enhanced Security and Compliance

Security can’t be an afterthought, even for startups. With DevOps practices, security is integrated into every stage of the software development lifecycle—commonly referred to as DevSecOps. Automated security checks, vulnerability scanning, and compliance monitoring can be incorporated into CI/CD pipelines, ensuring that security is built into the development process rather than bolted on afterward.

Additionally, by adopting IaC, startups can ensure that infrastructure complies with security standards, as configurations are defined and maintained in version-controlled code. This consistency makes it easier to audit changes and ensure compliance with industry regulations.

Key Takeaway: DevSecOps ensures security is integrated into every stage of development, enhancing trust with users and stakeholders.

Rapid Experimentation and Innovation

Startups need to innovate rapidly and experiment with new ideas to stay relevant. DevOps enables rapid experimentation by providing a safe and repeatable process for deploying new features and testing their impact in production environments. With CI/CD, teams can implement new features or changes in small, incremental releases, which can be quickly rolled back if something goes wrong.

This process encourages a culture of experimentation, where teams can test hypotheses, gather customer feedback, and iterate based on real-world results—all while maintaining the stability of the core product.

Key Takeaway: DevOps encourages rapid experimentation, allowing startups to test and implement ideas faster without compromising product stability.

Conclusion

For software development startups, the adoption of DevOps practices like Continuous Integration, Continuous Deployment, and Infrastructure as Code is no longer optional—it’s essential for scaling effectively and staying competitive in a dynamic market. The benefits are clear: faster time-to-market, improved collaboration, cost efficiency, enhanced product quality, and a culture of innovation. By investing in DevOps early, startups can position themselves for long-term success while delivering high-quality, reliable products to their customers.

DevOps isn’t just about tools and automation—it’s about building a culture of continuous improvement, collaboration, and agility. And for startups, that’s a recipe for success.

By integrating these practices into your startup’s workflow, you’re setting your team up for faster growth and a more robust, adaptable business model. The time to start is now.

Built a Feature-Rich QR Code Generator with Generative AI and JavaScript

In today’s digital world, QR codes have become ubiquitous. From restaurant menus to product packaging, these scannable squares offer a convenient way to access information. This article details the creation of a versatile QR code generator that leverages the power of generative AI and JavaScript for a seamless user experience, all within the user’s environment.

Empowering Development with Generative AI

The project began by utilizing generative AI tools to generate boilerplate code. This innovative approach demonstrates the potential of AI to streamline development processes. Prompts are used to create a foundation, allowing developers to focus on implementing advanced functionalities.

Generative AI Coding primer

Open Google Gemini and type the following

Assume the role of a HTML coding expert <enter>

Watch for the response, and if it is positive, go ahead and continue to tell it what you want. Actually for this project the next prompt I gave was:

Show me an HTML boiler plate starter with Bootstrap and JQquery linked from public cdn libraries.

Then for each element, the correct description was suggested, like adding form, text input, further reset button, submit button, and download button initially hidden. The rest of the functionality was very easy with qrcodejs library and further new chat with role setting.

Assume the role of a JavaScript programmer with hefty JQuery experience.

Further prompts were curated to get the whole builder ready still I had to use a bit of my expertise and commonsense, while local testing was done using the node js utility HTTP-server which was installed with Gemini’s suggested command.

prompt:

node http server install

from the response:

npm install http-server -g

Key Functionalities

The QR code generator boasts several user-friendly features, all processed entirely on the client-side (user’s device):

  • Phone Number Validation and WhatsApp Integration:
    • Users can input phone numbers, and the code validates them using regular expressions.
    • Validated numbers are converted into WhatsApp direct chat links, eliminating the need for external servers and simplifying communication initiation.
  • QR Code Generation for Phone Calls:
    • The application generates QR codes that trigger phone calls when scanned by a mobile camera when provided with the proper intent URL. tel://<full mobile number>
    • This is a practical solution for scenarios like displaying contact information on a car, without ever sending your phone number outside your device.

Technical Deep Dive

The project leverages the following technologies, emphasizing the client-side approach:

  • Client-Side Functionality with JavaScript:
    • This eliminates the need for a server, making the application fast, efficient, and easy to deploy. Users experience no delays while generating QR codes, and all processing stays within their browser.
  • AWS S3 Website Delivery:
    • Cost-effective and scalable hosting for the static website ensures smooth operation. S3 simply serves the application files, without any server-side processing of user data.
  • AWS CloudFront for Global Edge Caching and Free SSL:
    • CloudFront enhances performance by caching static content closer to users globally, minimizing latency. Free SSL certification guarantees secure communication between users and your website, even though no user data is transmitted.
    • Please visit review and comment on my QR Code Generator, the known bug in some mobile phones is the download fails, which I will see to as soon as possible, if that is the case with your phone take a screenshot and crop it up for the time being. On Samsung devices I think the power button and volume down pressed together would take a screenshot.

Unveiling the Cloud: A Recap of AWS Community Day Mumbai 2024

On April 6th, the Mumbai cloud community converged at The Lalit for AWS Community Day 2024. This electrifying one-day event, organized by the AWS User Group Mumbai, brought together enthusiasts from all walks of the cloud journey – from budding developers to seasoned architects.

A Day of Learning and Sharing

The atmosphere crackled with a shared passion for cloud technology. The agenda boasted a variety of sessions catering to diverse interests. Whether you were keen on optimizing multi-region architectures or building personalized GenAI applications, there was a talk designed to expand your knowledge base.

Workshops: Deep Dives into Specific Topics

For those seeking a more hands-on experience, workshops offered an invaluable opportunity to delve deeper into specific topics. Attendees with workshop passes could choose from two exciting options:

  • Lower latency of your multi-region architecture with Kubernetes, Couchbase, and Qovery on AWS: This workshop equipped participants with the know-how to optimize their multi-region deployments for minimal latency.
  • Create a personalised GenAI application with Snowflake, Streamlit and AWS Bedrock to cross-sell products: This session focused on building engaging GenAI applications that leverage the power of Snowflake, Streamlit, and AWS Bedrock to personalize the customer experience.

A Community of Builders

Beyond the technical learning, the true spirit of the event resided in the sense of community. The venue buzzed with conversations as attendees exchanged ideas, shared experiences, and built connections. This collaborative atmosphere fostered a valuable space for peer-to-peer learning and professional growth.

A Noteworthy Collaboration

The event was further enriched by the collaboration with Snowflake. Their insightful workshop on building personalized GenAI applications provided a unique perspective on leveraging cloud technologies for enhanced customer experiences.

A Day Well Spent

AWS Community Day Mumbai 2024 proved to be a resounding success. It offered a platform for attendees to gain valuable knowledge, explore the latest cloud innovations, and connect with a vibrant community. If you’re based in Mumbai and have a passion for cloud computing, attending the next AWS Community Day is a surefire way to elevate your skills and stay ahead of the curve.

Architecting SaaS Applications on AWS

During my career in different organizations, though I had the opportunity to architect multiple SaaS applications and most of them on AWS, I was not aware that I was already following most of the best practices. Only recently when I had a chance to view the Architecting Next Generation SaaS Applications on AWS by Tod Golding in AWS re:Invent 2016, I came to know the reality.

From the SaaS models which Tod had referred to, I had gone through the Silo, Bridge and Pool over several projects and had been bitten by most of the cons when using Silo I had experienced the maximum complication on the Agile deployment. Since I learned everything from my own experiences at that time, automated deployments or what is known as Continuous Integration and Continuous Deployment using standard tools was not known to me. And mostly I used to re-invent the wheel, using shell, Perl or PHP scripts. Skewed releases across tenant installations were mostly the nightmares.

Continue reading “Architecting SaaS Applications on AWS”