From Zero to Kubernetes: Automating a Minimal Cluster on AWS EC2 (My DevOps Journey)

The Unofficial Challenge: Why Automate Kubernetes on AWS?

Ever wondered if you could spin up a fully functional Kubernetes cluster on AWS EC2 with just a few commands? Four years ago, during my DevOps Masters Program, I decided to make that a reality. While the core assignment was to learn Kubernetes (which can be done in many ways), I set myself an ambitious personal challenge: to fully automate the deployment of a minimal Kubernetes cluster on AWS EC2, from instance provisioning to node joining.

Manual Kubernetes setups can be incredibly time-consuming, prone to errors, and difficult to reproduce consistently. I wanted to leverage the power of Infrastructure as Code (IaC) to create a repeatable, disposable, and efficient way to deploy a minimal K8s environment for learning and experimentation. My goal wasn’t just to understand Kubernetes, but to master its deployment pipeline, integrate AWS services seamlessly, and truly push the boundaries of what I could automate within a cloud environment.

The full github link: https://github.com/jthoma/code-collection/tree/master/aws/aws-cf-kubecluster

The Architecture: A Glimpse Behind the Curtain

At its core, my setup involved an AWS CloudFormation template (managed by AWS SAM CLI) to provision EC2 instances, and a pair of shell scripts to initialize the Kubernetes control plane and join worker nodes.

Here’s a breakdown of the key components and their roles in bringing this automated cluster to life:

AWS EC2: These are the workhorses – the virtual machines that would host our Kubernetes control plane and worker nodes.
AWS CloudFormation (via AWS SAM CLI): This is the heart of our Infrastructure as Code. CloudFormation allows us to define our entire AWS infrastructure (EC2 instances, security groups, IAM roles, etc.) in a declarative template. The AWS Serverless Application Model (SAM) CLI acts as a powerful wrapper, simplifying the deployment of CloudFormation stacks and providing a streamlined developer experience.
Shell Scripts: These were the crucial “orchestrators” running within the EC2 instances. They handled the actual installation of Kubernetes components (kubeadm, kubelet, kubectl, Docker) and the intricate steps required to initialize the cluster and join nodes.

When I say “minimal” cluster, I’m referring to a setup with just enough components to be functional – typically one control plane node and one worker node, allowing for basic Kubernetes operations and application deployments.

The Automation Blueprint: Diving into the Files

The entire orchestration was handled by three crucial files, working in concert to bring the Kubernetes cluster to life:

template.yaml (The AWS CloudFormation Backbone): This YAML file is where the magic of Infrastructure as Code happens. It outlines our EC2 instances, their network configurations, and the necessary security groups and IAM roles. Critically, it uses the UserData property within the EC2 instance definition. This powerful property allows you to pass shell commands or scripts that the instance executes upon launch. This was our initial entry point for automation.

   You can view the `template.yaml` file on GitHub [here](https://www.google.com/search?q=https://github.com/jthoma/code-collection/blob/master/aws/aws-cf-kubecluster/template.yaml).

kube-bootstrap.sh (The Instance Preparation Script): This script is the first to run on our EC2 instances. It handles all the prerequisites for Kubernetes: installing Docker, the kubeadm, kubectl, and kubelet binaries, disabling swap, and setting up the necessary kernel modules and sysctl parameters that Kubernetes requires. Essentially, it prepares the raw EC2 instance to become a Kubernetes node.

   You can view the `kube-bootstrap.sh` file on GitHub [here](https://www.google.com/search?q=https://github.com/jthoma/code-collection/blob/master/aws/aws-cf-kubecluster/kube-bootstrap.sh).

kube-init-cluster.sh (The Kubernetes Orchestrator): Once kube-bootstrap.sh has laid the groundwork, kube-init-cluster.sh takes over. This script is responsible for initializing the Kubernetes control plane on the designated master node. It then generates the crucial join token that worker nodes need to connect to the cluster. Finally, it uses that token to bring the worker node(s) into the cluster, completing the Kubernetes setup.

   You can view the `kube-init-cluster.sh` file on GitHub 

The Deployment Process: sam deploy -g in Action

The entire deployment process, from provisioning AWS resources to the final Kubernetes cluster coming online, is kicked off with a single, elegant command from the project’s root directory:

sam deploy -g

The -g flag initiates a guided deployment. AWS SAM CLI interactively prompts for key parameters like instance types, your AWS EC2 key pair (for SSH access), and details about your desired VPC. This interactive approach makes the deployment customizable yet incredibly streamlined, abstracting away the complexities of direct CloudFormation stack creation. Under the hood, SAM CLI translates your template.yaml into a full CloudFormation stack and handles its deployment and updates.

The “Aha!” Moment: Solving the Script Delivery Challenge

One of the most persistent roadblocks I encountered during this project was a seemingly simple problem: how to reliably get kube-bootstrap.sh and kube-init-cluster.sh onto the newly launched EC2 instances? My initial attempts, involving embedding the scripts directly into the UserData property, quickly became unwieldy due to size limits and readability issues. Other complex methods also proved less than ideal.

After several attempts and a bit of head-scratching, the elegant solution emerged: I hosted both shell scripts in a public-facing downloads folder on my personal blog. Then, within the EC2 UserData property in template.yaml, I simply used wget to download these files to the /tmp directory on the instance, followed by making them executable and running them.

This approach proved incredibly robust and streamlined. It kept the CloudFormation template clean and manageable, while ensuring the scripts were always accessible at launch time without needing complex provisioning tools or manual intervention. It was a classic example of finding a simple, effective solution to a tricky problem.

Lessons Learned and Key Takeaways

This project, born out of an academic requirement, transformed into a personal quest to master automated Kubernetes deployments on AWS. It was a journey filled with challenges, but the lessons learned were invaluable:

Problem-Solving is Key: Technical roadblocks are inevitable. The ability to iterate, experiment, and find creative solutions is paramount in DevOps.
The Power of Infrastructure as Code (IaC): Defining your infrastructure programmatically is not just a best practice; it’s a game-changer for reproducibility, scalability, and disaster recovery.
Automation Principles: Breaking down complex tasks into manageable, automated steps significantly reduces manual effort and error.
AWS CloudFormation and UserData Versatility: Understanding how to leverage properties like UserData can unlock powerful initial setup capabilities for your cloud instances.
Persistence Pays Off: Sticking with a challenging project until it works, even when faced with frustrating issues, leads to deep learning and a huge sense of accomplishment.

While this was a fantastic learning experience, if I were to revisit this project today, I might explore using a dedicated configuration management tool like Ansible for the in-instance setup, or perhaps migrating to a managed Kubernetes service like EKS for production readiness. However, for a hands-on, foundational understanding of automated cluster deployment, this self-imposed challenge was truly enlightening.

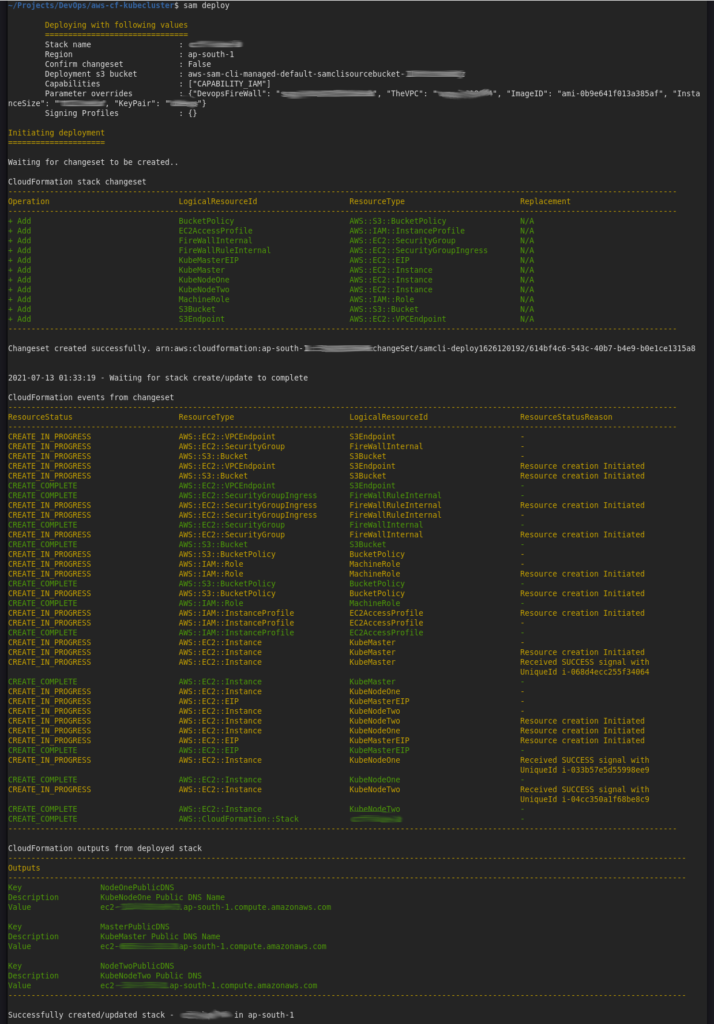
Last time when I ran it the console was as follows:
Conclusion

This project underscored that with a bit of ingenuity and the right tools, even complex setups like a Kubernetes cluster can be fully orchestrated and deployed with minimal human intervention. It’s a testament to the power of automation in the cloud and the satisfaction of bringing a challenging vision to life.

I hope this deep dive into my automated Kubernetes cluster journey has been insightful. Have you embarked on similar automation challenges? What unique problems did you solve? Share your experiences in the comments!
Building a Fully Mobile DevOps + Web Dev Stack Using Android + Termux

Overview

This is a journey through my personal developer stack that runs entirely on Android devices using Termux, a few custom scripts, and AWS infrastructure. From hosting WordPress on ECS to building serverless REST APIs in under 90 minutes, every part of this pipeline was built to work on mobile with precision and control.

📱 No laptop. No desktop. Just Android + Termux + Dev discipline.

🔧 Core Stack Components

  • Android + Termux: Primary development environment
  • Docker + Jenkins + MySQL/MariaDB: For CI/CD and content management
  • Static blog pipeline: Converts WordPress to static site with wget, sed, gzip, AWS CLI
  • AWS S3 + CloudFront: Hosting & CDN for ultra-low cost (\$8/year infra)
  • Custom shell scripts: Shared here: GitHub – jthoma/code-collection
  • GitHub integration: Direct push-pull and update from Android environment

🖥️ Development Environment Setup

  • Base OS: Android (Galaxy M14, A54, Tab S7 FE)
  • Tools via Termux: git, aws-cli, nodejs, ffmpeg, imagemagick, docker, nginx, jq, sam
  • Laptop alias (start blog) replaced with automated EC2 instance and mobile scripts
  • Jenkins auto-triggered publish pipeline via shell script and wget/sed

🔐 Smart IP Firewall Update from Mobile

A common challenge while working from mobile networks is frequently changing public IPs. I built a serverless solution that:

  1. Uses a Lambda + API Gateway to return my current public IP

echo-my-ip
https://github.com/jthoma/code-collection/tree/master/aws/echo-my-ip

  1. A script (aws-fw-update.sh) fetches this IP and:
  • Removes all existing rules
  • Adds a new rule to AWS Security Groups with current IP
    aws-fw-update.sh

🧹 Keeps your firewall clean. No stale IPs. Secure EC2 access on the move.

🎥 FFmpeg & ImageMagick for Video Edits on Android

I manipulate dashcam videos, timestamp embeds, and crops using FFmpeg right inside Termux. The ability to loop through files with while, seq, and timestamp math is far more precise than GUI tools — and surprisingly efficient on Android.

🧠 CLI = control. Mobile ≠ limited.

🌐 Web Dev from Android: NGINX + Debugging

From hosting local web apps to debugging on browsers without dev tools:

  • 🔧 NGINX config optimized for Android Termux
  • 🐞 jdebug.js for browser-side debugging when no console exists
    Just use: jdbg.inspect(myVar) to dump var to dynamically added <textarea>

Tested across Samsung Galaxy and Tab series. Works offline, no extra apps needed.

Case Study: 7-Endpoint API in 80 Minutes

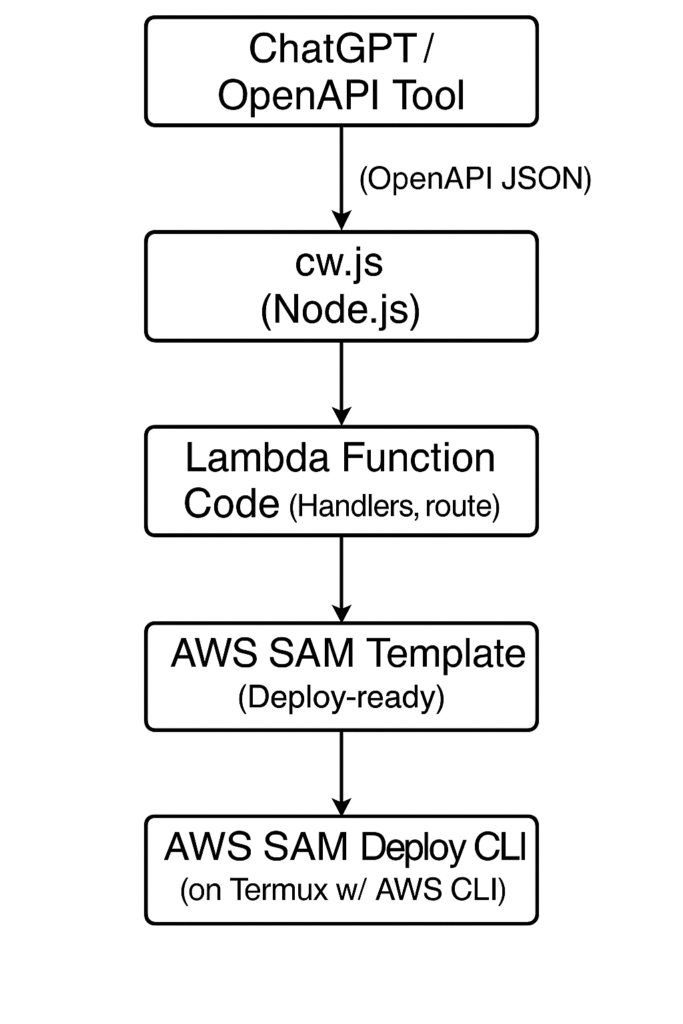
  • Defined via OpenAPI JSON (generated by ChatGPT)
  • Parsed using my tool cw.js (Code Writer) → scaffolds handlers + schema logic
  • Deployed via my aws-nodejs-lambda-framework
  • Backed by AWS Lambda + DynamoDB

✅ Client testing ready in 1 hour 20 minutes
🎯 Client expectation: “This will take at least 1 week”

Built on a Samsung Galaxy Tab S7 FE in Termux. One cliche is that I do have the samsung full keyboard book case cover for the tab.
No IDE. No laptop.

🔁 Flow Diagram:


🔚 Closing Thoughts

This entire DevOps + Dev stack proves one thing:

⚡ With a few smart scripts and a mobile-first mindset, you can build fast, secure, and scalable infrastructure from your pocket.

I hope this inspires other engineers, digital nomads, and curious tinkerers to reimagine what’s possible without a traditional machine.

👉 https://github.com/jthoma/code-collection/

Apart from what explained step by step there are a lot more and most of the scripts are tested on both Ubuntu linux and Android Termux. Go there and explore whatever is there.

💬 Always open to collaboration, feedback, and new automation ideas.

Follow me on linkedin

Get My IP and patch AWS Security Group

My particular use case was that In my own AWS Account where I do most of the R&D I had one security group which was only for me doing SSH into EC2 instances. Way back in 2020 during pandemic season, had to go freelance for sometime while in notice period with one company and in negotiation with another one. Well this time I was mostly connected from mobile hotspot switching from JIO on Galaxy M14 to Airtel on Galaxy A54 and BSNL on second sim of M14 and this was causing my security group update a real pain.

Basically being lazy and having devops and automation since long back. Started working on an idea an the outcome was an AWS Serverless clone of what is my ip service which is named echo my ip. Check it out on github. The nodejs code and aws sam template to deploy is given over there.

Next using the standard Ubuntu terminal text editor added the following to the .bash_aliases file.

sgupdate()
{
  currentip=$(curl --silent https://{api gateway url}/Prod/ip/)
  /usr/local/bin/aws ec2 describe-security-groups --group-id $AWS_SECURITY_GROUP > /dev/shm/permissions.json
  grep CidrIp /dev/shm/permissions.json | grep -v '/0' | awk -F'"' '{print $4}' | while read cidr;
   do
     /usr/local/bin/aws ec2 revoke-security-group-ingress --group-id $AWS_SECURITY_GROUP --ip-permissions "FromPort=-1,IpProtocol=-1,IpRanges=[{CidrIp=$cidr}]"
   done   
  /usr/local/bin/aws ec2 authorize-security-group-ingress --group-id $AWS_SECURITY_GROUP --protocol "-1" --cidr "$currentip/32"
}

alias aws-permit-me='sgupdate'

I already have a .env file for every project I am handling and a cd command will check for existance of .env and source it in case it exists.

cwd(){
  cd $1
  if [ -f .env ] ; then
    . .env
  fi
}

alias cd='cwd'

The env file is of structure as follows with coresponding values after the ‘=’ ofcourse.

export AWS_DEFAULT_REGION=
export AWS_ACCESS_KEY_ID=
export AWS_SECRET_ACCESS_KEY=
export AWS_SECURITY_GROUP=
export AWS_SSH_ID=
export AWS_ACCOUNT=

It’s a common problem for people working from home with dynamic IPs to manage firewall rules. Automating the process with a serverless function and a shell alias is a great way to simplify things. Sharing on github is to help others and provide back to the community.

This method provides some advantages

  • Automation: Eliminates the tedious manual process of updating security group rules.
  • Serverless: Cost-effective, as you only pay for the compute time used.
  • Shell Alias: Provides a convenient and easy-to-remember way to trigger the update.
  • GitHub Sharing: Makes the solution accessible to others.
  • Secure: Security Group Modification uses aws cli and credentials in terminal environment

Exploring AI to the deep end – Facebook Reels

Today was exploring more of AI tools and many more.

Using chat-gpt generated a prompt for leonardo ai to create a subtle scenery.

Using GIMP on Ubuntu the scene was upscaled and cropped to 810:1440 ie 9:16 resolution. Used AI Music to generate a 30 second lo-fi bgm.mp3. using a PHP script generated 840 lines in format fname brightness contrast with values in a gradual change. This information was used in a loop for invoking imagemagic convert and create 840 frames. finally ffmpeg -i “%04d.jpg” -i bgm.mp3 -r 30 dusk.mp4. since frame rate is 30 and frames are 840, the video is of length 28 seconds and can be shared on facebook as a reel. That was my target.

Prompt in Chat GPT:

Suggest a detailed prompt for leonardo ai to generate a scenic view of country side just before sunset and the sun is behind the viewer.

The response, trimmed to the relevant portion which was further given to Leonardo AI:

A breathtaking countryside landscape bathed in the warm glow of the golden hour, just before sunset. The sun is behind the viewer, casting long, soft shadows over rolling green hills. A winding dirt road leads through fields of wildflowers in shades of lavender, yellow, and white, gently swaying in the breeze. A rustic wooden fence lines the path, guiding the eye toward a quaint farmhouse with a red roof and smoke curling from its chimney. Lush trees with golden-hued leaves dot the horizon, their branches swaying gently. A calm river reflects the soft, pastel hues of the evening sky—lavender, peach, and rose gold—while birds soar gracefully in the distance. The scene exudes warmth, tranquility, and a sense of peaceful solitude.

This was of dimension 1472×832 though I had set 16:9 resolution in the Leonardo image generator app.

Since I am on XUbuntu here I used GIMP to first upscale. As height required was 1440 the width proportionally came to 2548 once the scaling was done, chose canvas size from the image menu. setting width to 810 and position to center, since I needed 9:16 for Facebook reel.

Now for progressive frame generation a short script was written. For which the max thresholds were identified using GIMP. Colors -> Brightness & Contrast then in the slider, manually tweaking until the image was fully black. tried to fix these values to easy to calculate. And arrived at Brightness -120 and Contrast + 60. With a frame rate of 30 per second, a 28 second video will need 840 frames. So applying that brightness is 0 to -120 in 840 frames which evaluates to reduce by 1 in every 7 frames, whereas contrast is 0 to 60 and that evaluates to increase of 1 in every 14 frames. This was implemented using php scripting.

<?php

/*
brightness    0 => -120  7:1
Contrast      0 => 60   14:1

frames 840
*/

$list = range(1,840);

$bt = 0;
$ct = 0;

$bv = 0;
$cv = 0;

foreach($list as $sn){
   
   if($bt == 7){
   	$bv += 1;
   	$bt = 0;
   }
   
   if($ct == 14){
   	$cv += 1;
   	$ct = 0;
   }
      
   $bt++;
   $ct++;
   
   echo str_pad($sn, 4, '0', STR_PAD_LEFT)," $bv $cv","\n";
}

?>

This was further run from the command line and the output captured in a text file. Further a while loop creates the frames using image magik convert utility.

php -q bnc.php > list.txt

mkdir fg

cat list.txt | while read fi bv cv; do convert scene.jpg -brightness-contrast -${bv}x${cv} fg/${fi}.jpg ; done

cd fg
ffmpeg -i %04d.jpg -i /home/jijutm/Downloads/bgm-sunset.mp3 -r 30 ../sunset-reel.mp4

The bgm-sunset.mp3 was created using AI music generator and edited in audacity for special effects like fade in fade out etc.

Why this workflow is effective:

Automation: The PHP script and ImageMagick loop automate the tedious process of creating individual frames, saving a lot of time and effort.
Cost-effective: Using open-source tools like GIMP and FFmpeg keeps the cost down.
Flexibility: This approach gives a high degree of control over every aspect of the video, from the scenery to the music and the visual effects.
Efficient: By combining the strengths of different AI tools and traditional image/video processing software, this streamlined workflow is defined that gets the job done quickly and effectively.

The final reel on facebook page , see that also.

AWS DynamoDB bulk migration between regions was a real pain.

Go and try searching for “migrate 20 dynamodb tables from singapore to Mumbai” on google and sure that you will get mostly migrating between accounts. But the real pain is that even though the documents say that full backup and restore is possible, the table has to be created with all the inherent configurations and when number of tables increases like 10 to 50 it becomes a real headache. I am attempting to automate this to the maximum extend possible using couple of shell scripts and a javascript code to rewrite exported json structure to that of a structure that can be taken by create option in the aws cli v2.

See the rest for real at the github repository

This post is Kept in Short and Simple format to transfer all importance to the github code release.

Conquering Time Limits: Speeding Up Dashcam Footage for Social Media with FFmpeg and PHP

Introduction:

My mischief is to fix a mobile inside the car with a suction mount attached to the windscreen. This mobile would capture video from start to finish of each trip. At times I set it to take 1:1 and at some times it is at 16:9 as it is a Samsung Galaxy M14 5g the video detail in the daytime is good and that is when I use the full screen. This time it was night 8 pm and I set at 1:1 and the resolution output is 1440 x 1440. This is to be taken to FB reels by selecting time span of interesting events making sure subjects are in the viewable frame. Alas, Facebook will take only 9:16 and a max of 30 seconds in the reels. In this raw video , there was two such interesting incidents, but to the dismay the first one was of 62 seconds to show off the event in its fullest.

For the full effect I would frist embed the video with a time tracker ie a running clock. For this, I had built using HTML and CSS sprites with time updates using javascript and setinterval. http://bz2.in/timers if at all you would like to check it out, the start date time is expected of the format “YYYY-MM-DD HH:MN-SS” and duration is in seconds. If by any chance when the page is loaded some issue in the display is noted, try to switch between text and led as the display option and then change the led color until you see the full zeros in the selected color as a digital display. Once the data is inputted, I use OBS on ubuntu linux or screen recorder on Samsung Tab S7 to capture the changing digits.

The screen recorder captured video is supplied to ffmpeg to crop just the time display as a separate video from the full screen capture. The frame does not change for each session. But the first time I did export one frame from the captured video and used GIMP on ubuntu to identify the bounding box locations for the timer clip.
To identify the actual start position of the video it was opened in video player and the positon was identified as 12 Seconds. Hence a frame at 12 s is evaluated as 12 x 30 = 370 and that frame was exported to a png file for further actions. I used the following command to export one frame.

ffmpeg -i '2025-02-04 19-21-30.mov' -vf "select=eq(n\,370)" -vframes 1 out.png

By opening this out.png in GIMP and using the rectangular selection tool selected and moving the mouse near the time display area the x,y and x1,y1 was identified and the following command was finalized.

ffmpeg -i '2025-02-04 19-21-30.mov' -ss 12 -t 30 -vf "crop=810:36:554:356" -q:v 0 -an timer.mp4

The skip (-ss 12) is identified manually by previewing the source file in the media player.

The relevant portion from the full raw video is also captured using ffmpeg as follows.

ffmpeg -i 20250203_201432.mp4 -ss 08:08 -t 62 -vf crop=810:1440:30:0 -an reels/20250203_201432_1.mp4

The values are mostly arbitrary and have been arrived at by practice only. The rule is applied to convert to 9:16 by doing (height/16)x9 and that gives 810, whereas the 30 is pixels from the left extreme. That is because I wanted the left side of the clip to be fully visible.

Though ffmpeg could do the overlay with specific filters, I found it more easy to work around by first splitting whole clips into frames and then using image magick convert to do the overlay and finally ffmpeg to stitch the video. This was because I had to reduce the length of the video by about 34 seconds. And this should happen only after the time tracker overlay is done. So the commands which I used are.

created few temporary folders

mkdir ff tt gg hh

ffmpeg -i clip.mp4 ff/%04d.png
ffmpeg -i timer.mp4 tt/%04d.png

cd ff

for i in *.png ; do echo $i; done > ../list.txt
cd ../

cat list.txt | while read fn; do convert ff/$fn tt/$fn -gravity North -composite gg/$fn; done

Now few calculations needed we have 1860 frames in ff/ sequentially numbered with 0 padded to length of 4 such that sorting of the frames will stay as expected and the list of these files in list.txt. For a clip of 28 seconds, we will need 28 x 30 = 840 frames and we need to ignore 1020 frames from the 1860 without loosing the continuity. For achieving this my favorite scripting language PHP was used.

<?php

/* 
this is to reduce length of reel to 
remove logically few frames and to 
rename the rest of the frames */

$list = @file('./list.txt');  // the list is sourced
$frames = count($list); // count of frames

$max = 28 * 30; // frames needed

$sc = floor($frames / $max);
$final = [];  // capture selected frames here
$i = 0;

$tr = floor($max * 0.2);  // this drift was arrived by trial estimation

foreach($list as $one){
  if($i < $sc){
     $i++;
  }else{
    $final[] = trim($one);
    $i = 0;
  }
  if(count($final) > $tr){
  	$sc = 1;
  }
}


foreach($final as $fn => $tocp){
   $nn = str_pad($fn, 4, '0', STR_PAD_LEFT) . '.png';
   echo $tocp,' ',$nn,"\n";
}

?>

The above code was run and the output was redirected to a file for further cli use.

php -q renf.php > trn.txt

cat trn.txt | while read src tgt ; do cp gg/$src hh/$tgt ; done

cd hh
ffmpeg -i %04d.png -r 30 ../20250203_201432_1_final.mp4

Now the reel is created. View it on facebook

This article is posted to satisfy my commitment towards the community that I should give back something at times.

Thankyou for checking this out.

Car Dash Cam to Facebook Reels – An interesting technology journey.

Well, it started to be a really interesting technology journey as I am a core and loyal Ubuntu Linux user. On top of that I always am on the lookout to sharpen my DevOps instincts and skillset. Some people do say that it is because that I am quite lazy to do repetitive tasks the manual way. I don’t care about these useless comments. The situation is that like all car dash cameras, this one also will record any activity in front or back of the car at a decent resolution of 1280 × 720 but as one file each 5 minute. The system’s inherent bug was that it won’t unmount the sdcard properly; hence, to get the files, it need to be mounted on a Linux USB sdcard reader. The commands that I used to combine and overlay these files were combined and formatted into a shell script as follows:

#!/bin/bash

 find ./1 -type f -size +0 | sort > ./fc.txt
 sed -i -e 's#./#file #' ./fc.txt 

 find ./2 -type f -size +0 | sort > ./bc.txt
 sed -i -e 's#./#file #' ./bc.txt 
 
 ffmpeg -f concat -safe 0 -i ./bc.txt -filter:v "crop=640:320:0:0,hflip"  bc.mp4
ffmpeg -f concat -safe 0 -i ./fc.txt -codec copy -an  fc.mp4

ffmpeg -i fc.mp4 -i bc.mp4 -filter_complex "[1:v]scale=in_w:-2[over];[0:v][over]overlay=main_w-overlay_w-50:50" -c:v libx264 "combined.mp4"

To explain the above shell script, the find (./1 and ./2) dash cam saves front cam files in “./1” and rear cam files in “./2” and the filters make sure only files with minimum size greater than 0 will be listed and as the filenames are timestamp based the sort will do its job. The sorted listing is written into fc.txt and then sed used to stamp each filename with a text “file” at the begening which is required for ffmpeg to combine a list of files. The lines 3 and 4 does the sequential combine of rear cam and front cam files and the final one resizes the rear cam file and inset over the front cam file at a calculated width from right side top offset of 50 pixels. This setup was working fine till recently when the car was parked for a long period in very hot area when the camera mount which was using a kind of suction to the windscreen failed and the camera came loose, destroying the touch screen and functionality. As I had already been hooked to the dashcam footage, I got a mobile mount and started using my Galaxy M14 mounted to the windscreen.

Now there is only one camera and that is the front one, but I start the recording before engaging gears from my garage and then stop it only after coming to a full halt at the destination. This is my policy and I don’t want to get distracted while driving. Getting a facebook reel of 9:16 and less than 30 seconds from this footage is not so tough as I need to crop only 405×720 but the frame start location in pixels as well as the timespan is critical. This part I am doing manually. Then it is just a matter of ffmpeg crop filter.

ffmpeg <input> -ss <start> -t <duration> -vf crop=405:720:600:0 -an <output>

In the above command, crop=width:height:x:y is the format and this was okay until the interesting subject was at a relative stable position. But sometimes ther subject will move from left to right and cropping has to happen in a pan motion. For this I chose the hard way.

  1. Crop the interesting portion of the video by timeline without resolution change.
  2. Split frames into png files ffmpeg <input> %04d.png as long as frames are less than 1000 (duration * 30) 4 should be okay if not the padding has to be increased.
  3. Create a pan frame configuration in a text file with framefile x y on each line.
  4. Use image magic convert by looping through the above file say pos.txt
cat pos.txt | while read fn x y ; do convert ff/$fn -crop 405x720+$x+$y gg/$fn

Once this is completed, then use the following command to create the cropped video with pan effect.

ffmpeg -i ff/%04d.png -r 30 cropped.mp4

Well by this weekend I had the urge to enhance it a bit more, with a running clock display along the top or bottom of every post-processed video. For the same after some thoughts I created an html page with some built in preference tweaks saving all such tweaks into localstore effectively avoiding any serverside database or the sort. I have been benefitted by the Free and Open Source movement, and I feel it is my commitment to provide back. Hence the code is hosted on AWS S3 website with no restriction. Check out the mock clock display and if interested view the source also.

With the above said html, a running clock display starting from a timestamp and runs for a supplied duration with selected background and foreground colors and font size etc is displayed on the browser. I capture this video using OBS on my laptop, builtin screen recorder on my Samsung Galaxy Tab S7 FE and then use ffmpeg to crop the exact time display from the full screen video. This video is also split into frames and corresponding frames overlayed on top of the reel clip frame also using convert and the pos.txt for the filenames.

cat pos.txt | while read fn x y ; do convert gg/$fn tt/$fn -gravity North -composite gt/$fn ; done

The gravity – “North” places the second input at the top of the first input whereas “South” will place at the bottom, similarly “East” and “West” and “Center” is also available.

Optimizing WordPress Performance with AWS, Docker and Jenkins

At Jijutm.com, I wanted to deliver a fast and reliable experience for our readers. To achieve this, I have implemented a containerized approach using Docker and Jenkins for managing this WordPress site. This article delves into the details of our setup and how it contributes to exceptional website performance.

Why Containers?

Traditional server management often involves installing software directly on the operating system. This can lead to dependency conflicts, versioning issues, and a complex environment. Docker containers provide a solution by encapsulating applications with all their dependencies into isolated units. This offers several advantages:

Consistency: Docker ensures a consistent environment regardless of the underlying operating system. This simplifies development, testing, and deployment.
Isolation: Applications running in containers are isolated from each other, preventing conflicts and improving security.
Portability: Docker containers are portable across different environments, making it easy to migrate your application between development, staging, and production.

The Containerized Architecture

This WordPress site leverages three Docker containers:

  1. Nginx: A high-performance web server that serves the content of this website efficiently.
  2. PHP-FPM: A FastCGI process manager that executes PHP code for dynamic content generation in WordPress.
  3. MariaDB: A robust and popular open-source relational database management system that stores the WordPress data and is fully compatible with MySQL.

These containers work together seamlessly to deliver a smooth user experience. Nginx acts as the front door, handling user requests and routing them to the PHP-FPM container for processing. PHP-FPM interacts with the MariaDB container to retrieve and update website data.

Leveraging Jenkins for Automation

While Docker simplifies application management, automating deployments is crucial for efficient workflow. This is where Jenkins comes in. Jenkins is an open-source automation server that we use to manage the build and deployment process for our WordPress site.

Here’s how Jenkins integrates into this workflow:

  1. Code Changes: Whenever we make changes to the WordPress codebase, we push them to a version control system like Git.
  2. Jenkins Trigger: The push to the Git repository triggers a job in Jenkins.
  3. Build Stage: Jenkins pulls the latest code, builds a new Docker image containing the updated WordPress application, and pushes it to a Docker registry.
  4. Deployment Stage: The new Docker image is deployed to our hosting environment, updating the running containers with the latest code.

This automation ensures that our website stays up-to-date with the latest changes without any manual intervention.

Hooked into WordPress Post or Page Publish.

Over and above maintaining the code using Jenkins, each content Publish action triggers another Jenkins project, which runs a sequence of commands. wget in mirror mode to convert the whole site to static HTML files. sed to rewrite the URLs from local host to realtime external domain specific. gzip to create .html.gz for each HTML files. aws cli to sync the static mirror folder with that in AWS S3 and finally apply meta headers to the files to specify the content type and content-encoding. When all the files are synced, the AWS CLI issues an invalidate request to the CloudFront distribution.

Benefits of this Approach

Improved Performance: Docker containers provide a lightweight and efficient environment, leading to faster loading times for this website.
Enhanced Scalability: I don’t need to bother about scaling this application by adding more containers to handle increased traffic, as that is handled by aws S3 and CloudFront.
Simplified Management: Docker and Jenkins automate a significant portion of the infrastructure management, freeing up time for development and content creation. With the docker and all components running in my Asus TUF A17 Laptop powered by XUbuntu the hosting charges are limited to AWS Route53, AWS S3 and AWS CloudFront only.
Reliable Deployments: Jenkins ensures consistent and reliable deployments, minimizing the risk of errors or downtime.
Well for minimal dynamic content like the download counters, AWS Serverless lambda functions are written and deployed for updating download requests into aDynamoDB table and to display the count near any downloadable content with proper markup. Along with this the comments are moved into Disqus, as it is a comment system that can be used on WordPress sites. It can replace the native WordPress comments system.

Conclusion

By leveraging Docker containers and Jenkins, I have established a robust and performant foundation for this site. This approach allows me to focus on delivering high-quality content to the readers while ensuring a smooth and fast user experience.

Additional Considerations

Security: While Docker containers enhance security, it’s essential to maintain secure practices like keeping Docker containers updated and following security best practices for each service.
Monitoring: Monitoring the health and performance of your containers is crucial. Tools like Docker Stats and Prometheus can provide valuable insights.

Hope this article provides a valuable perspective on how Docker and Jenkins can be used to optimize a WordPress website. If you have any questions, feel free to leave a comment below!

Automating Church Membership Directory Creation: A Case Study in Workflow Efficiency

Maintaining and publishing a church membership directory is a meticulous process that often requires managing sensitive data and adhering to strict timelines. Traditionally, this would involve significant manual effort, often taking days to complete. In this blog post, I will share how I streamlined this process by automating the workflow using open-source tools. This approach not only reduced the time from several hours to under 13 minutes but also ensured accuracy and repeatability, setting a benchmark for efficiency in handling similar projects. Specifically it should be noted that the complicated sorting they needed for the final output could have taken the same time if done manually in case of last minute changes like addition or removal of a member that too if a head of the family expired and has to be updated before taking final output the whole prayer group sorting can affect. Consider the head of the family name was starting with Z and when removed automatic upgrade of the next member to head of family and the name starts with A the whole prayer group layout has a chance to take drastic change and manual layout would be herculian in this case. But with this implementation of automation, that is another 15 minutes to the maximum just a flag change in the xls and the command line “make directory” will run through the full process.

Workflow Overview

The project involves converting an xls file containing membership data into a print-ready PDF. The data and member photographs are maintained by a volunteer team on Google Sheets and google drive, these are shared via Google Drive. Each family has a unique register number, and members are assigned serial numbers for photo organization. The workflow is orchestrated using GNU Make, with specific tasks divided into stages for better manageability.

Stage 1: Photo Processing

Tools Used:

  • Bash Shell Scripts for automation
  • ImageMagick for photo dimension checking and resizing

The photo directory is processed using identify (ImageMagick) to determine the dimensions of each image. This ensures that all photos meet the required quality (300 DPI for print). Images that are too large or too small are adjusted using convert, ensuring consistency across all member profiles.

Stage 2: Importing Data into MySQL

Tools Used:

  • MySQL for data management
  • Libre Office Calc to export xls to csv
  • Bash and PHP Scripts for CSV import

The exported CSV data is imported into a MySQL database. This allows for sorting, filtering, and advanced layout calculations, providing a structured approach to organizing the data.

Stage 3: Data Sorting and Layout Preparation

Tools Used:

  • MySQL Queries for layout calculations

The data is grouped and sorted based on location and family register numbers. For each member, a layout height and page number are calculated and updated in the database. This ensures a consistent and visually appealing directory design.

Stage 4: PDF Generation

Tools Used:

  • PHP and FPDF Library

Using PHP and FPDF, the data is read from MySQL, and PDFs are generated for each of the 12 location-based groups. During this stage, indexes are also created to list register numbers and member names alongside their corresponding page numbers.

Stage 5: Final Assembly and Indexing

Tools Used:

  • GNU Make for orchestration
  • PDF Merge Tools

The 12 individual PDFs generated in the previous stage are stitched together into a single document. The two indexes (by register number and by member name) are combined and appended to the final PDF. This single document is then ready for print.

Efficiency Achieved

Running the entire workflow on an ASUS A17 with XUbuntu, the process completes in less than 13 minutes. By comparison, a traditional approach using desktop publishing (DTP) software could take 20–30 hours, even with a skilled team working in parallel. The automated workflow eliminates manual errors, ensures uniformity, and significantly improves productivity.

Key Advantages of the Automated Workflow

  1. Time Efficiency: From 20–30 hours to 13 minutes.
  2. Accuracy: Eliminates manual errors through automation.
  3. Scalability: Easily accommodates future data updates or layout changes.
  4. Cost-Effective: Utilizes free and open-source tools.
  5. Repeatability: The process can be executed multiple times with minimal adjustments.

Tools and Technology Stack

  • Operating System: XUbuntu on ASUS A17
  • Photo Processing: ImageMagick (identify and convert)
  • Database Management: MySQL
  • Scripting and Automation: Bash Shell, GNU Make
  • PDF Generation: PHP, FPDF Library
  • File Management: Google Drive for data sharing

Conclusion

This project highlights the power of automation in handling repetitive and labor-intensive tasks. By leveraging open-source tools and orchestrating the workflow with GNU Make, the entire process became not only faster but also more reliable. This method can serve as a template for similar projects, inspiring others to embrace automation for efficiency gains.

Feel free to share your thoughts or ask questions in the comments below. If you’d like to adopt a similar workflow for your organization, I’d be happy to provide guidance!

Creating a Dynamic Image Animation with PHP, GIMP, and FFmpeg: A Step-by-Step Guide

Introduction

In this blog post, I’ll walk you through a personal project that combines creative image editing with scripting to produce an animated video. The goal was to take one image from each year of my life, crop and resize them, then animate them in a 3×3 grid. The result is a visually engaging reel targeted for Facebook, where the images gradually transition and resize into place, accompanied by a custom audio track.

This project uses a variety of tools, including GIMP, PHP, LibreOffice Calc, ImageMagick, Hydrogen Drum Machine, and FFmpeg. Let’s dive into the steps and see how all these tools come together.

Preparing the Images with GIMP

The first step was to select one image from each year that clearly showed my face. Using GIMP, I cropped each image to focus solely on the face and resized them all to a uniform size of 1126×1126 pixels.

I also added the year in the bottom-left corner and the Google Plus Code (location identifier) in the bottom-right corner of each image. To give the images a scrapbook-like feel, I applied a torn paper effect around the edges. Which was generated using Google Google Gemini using prompt “create an image of 3 irregular vertical white thin strips on a light blue background to be used as torn paper edges in colash” #promptengineering

Key actions in GIMP:

  • Crop and resize each image to the same dimensions.
  • Add text for the year and location.
  • Apply a torn paper frame effect for a creative touch.

Organizing the Data in LibreOffice Calc

Before proceeding with the animation, I needed to plan out the timing and positioning of each image. I used LibreOffice Calc to calculate:

  • Frame duration for each image (in relation to the total video duration).
  • The positions of each image in the final 3×3 grid.
  • Resizing and movement details for each image to transition smoothly from the bottom to its final position.

Once the calculations were done, I exported the data as a JSON file, which included:

  • The image filename.
  • Start and end positions.
  • Resizing parameters for each frame.

Automating the Frame Creation with PHP

Now came the fun part: using PHP to automate the image manipulation and generate the necessary shell commands for ImageMagick. The idea was to create each frame of the animation programmatically.

I wrote a PHP script that:

  1. Reads the JSON file and converts it to PHP arrays, which were manually hard-coded into the generator script. This is to define the positioning and resizing data.
  2. Generates ImageMagick shell commands to:
  • Place each image on a 1080×1920 blank canvas.
  • Resize each image gradually from 1126×1126 to 359×375 over several frames.
  • Move each image from the bottom of the canvas to its final position in the 3×3 grid.

Here’s a snippet of the PHP code that generates the shell command for each frame:

This script dynamically generates ImageMagick commands for each image in each frame. The resizing and movement of each image happens frame-by-frame, giving the animation its smooth, fluid transitions.


Step 4: Creating the Final Video with FFmpeg

Once the frames were ready, I used FFmpeg to compile them into a video. Here’s the command I referred, for the exact project the filnenames and paths were different.

ffmpeg -framerate 30 -i frames/img_%04d.png -i audio.mp3 -c:v libx264 -pix_fmt yuv420p -c:a aac final_video.mp4

This command:

  • Takes the image sequence (frames/img_0001.png, frames/img_0002.png, etc.) and combines them into a video.
  • Syncs the video with a custom audio track created in Hydrogen Drum Machine.
  • Exports the final result as final_video.mp4, ready for Facebook or any other platform.

Step 5: The Final Touch — The 3×3 Matrix Layout

The final frame of the video is particularly special. All nine images are arranged into a 3×3 grid, where each image gradually transitions from the bottom of the screen to its position in the matrix. Over the course of a few seconds, each image is resized from its initial large size to 359×375 pixels and placed in its final position in the grid.

This final effect gives the video a sense of closure and unity, pulling all the images together in one cohesive shot.

Conclusion

This project was a fun and fulfilling exercise in blending creative design with technical scripting. Using PHP, GIMP, ImageMagick, and FFmpeg, I was able to automate the creation of an animated video that showcases a timeline of my life through images. The transition from individual pictures to a 3×3 grid adds a dynamic visual effect, and the custom audio track gives the video a personalized touch.

If you’re looking to create something similar, or just want to learn how to automate image processing and video creation, this project is a great starting point. I hope this blog post inspires you to explore the creative possibilities of PHP and multimedia tools!

The PHP Script for Image Creation

Here’s the PHP script I used to automate the creation of the frames for the animation. Feel free to adapt and use it for your own projects:

<?php

// list of image files one for each year
$lst = ['2016.png','2017.png','2018.png','2019.png','2020.png','2021.png','2022.png','2023.png','2024.png'];

$wx = 1126; //initial width
$hx = 1176; //initial height

$wf = 359;  // final width
$hf = 375;  // final height

// final position for each year image
// mapped with the array index
$posx = [0,360,720,0,360,720,0,360,720];
$posy = [0,0,0,376,376,376,752,752,752];

// initial implant location x and y
$putx = 0;
$puty = 744;

// smooth transition frames for each file
// mapped with array index
$fc = [90,90,90,86,86,86,40,40,40];

// x and y movement for each image per frame
// mapped with array index
$fxm = [0,4,8,0,5,9,0,9,18];
$fym = [9,9,9,9,9,9,19,19,19];

// x and y scaling step per frame 
// for each image mapped with index
$fxsc = [9,9,9,9,9,9,20,20,20];
$fysc = [9,9,9,10,10,10,21,21,21];

// initialize the file naming with a sequential numbering

$serial = 0;

// start by copying the original blank frame to ramdisk
echo "cp frame.png /dev/shm/mystage.png","\n";

// loop through the year image list

foreach($lst as $i => $fn){
    // to echo the filename such that we know the progress
    echo "echo '$fn':\n"; 

    // filename padded with 0 to fixed width
    $newfile = 'frames/img_' . str_pad($serial, 4,'0',STR_PAD_LEFT) . '.png';

// create the first frame of an year
    echo "composite -geometry +".$putx."+".$puty."  $fn /dev/shm/mystage.png  $newfile", "\n";

    $tmx = $posx[$i] - $putx;

    $tmy = $puty - $posy[$i];

    // frame animation
    $maxframe = ($fc[$i] + 1);
    for($z = 1; $z < $maxframe ; $z++){

        // estimate new size 
        $nw = $wx - ($fxsc[$i] * $z );
        $nh = $hx - ($fysc[$i] * $z );

        $nw = ($wf > $nw) ? $wf : $nw;
        $nh = ($hf > $nh) ? $hf : $nh;

        $tmpfile = '/dev/shm/resized.png';
        echo "convert $fn  -resize ".$nw.'x'.$nh.'\!  ' . $tmpfile . "\n";

        $nx = $putx + ( $fxm[$i] * $z );
        $nx = ($nx > $posx[$i]) ? $posx[$i] : $nx; 

        if($posy[$i] > $puty){
            $ny = $puty + ($fym[$i] * $z) ;
            $ny = ($ny > $posy[$i]) ? $posy[$i] : $ny ;
        }else{
            $ny = $puty - ($fym[$i] * $z);
            $ny = ($posy[$i] > $ny) ? $posy[$i] : $ny ;
        }

        $serial += 1;
        $newfile = 'frames/img_' . str_pad($serial, 4,'0',STR_PAD_LEFT) . '.png';
        echo 'composite -geometry +'.$nx.'+'.$ny."  $tmpfile /dev/shm/mystage.png  $newfile", "\n";
    }

    // for next frame use last one
     // thus build the final matrix of 3 x 3
    echo "cp $newfile /dev/shm/mystage.png", "\n";
}