Why I Built an AWS Node.js Lambda Framework (And What It Solves)

Over the past 8–10 years, I’ve run into the same set of issues again and again when deploying Node.js applications to AWS Lambda—especially those built with the popular Express.js framework.

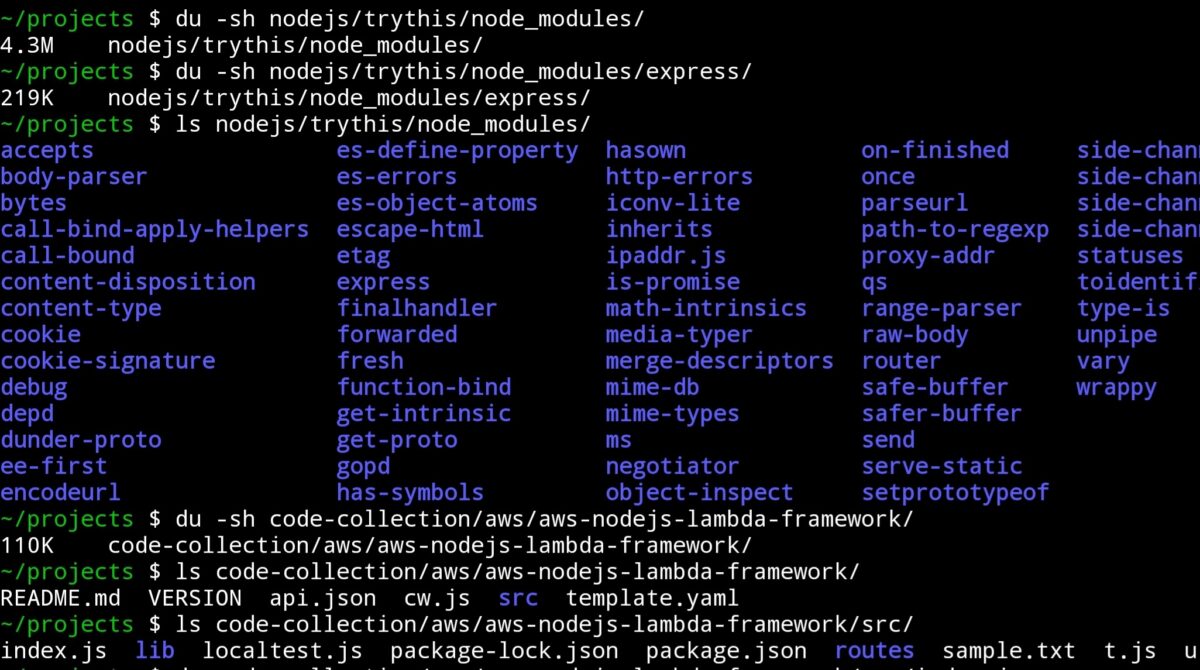
While Express is just 219 KB, the dependency bloat is massive—often exceeding 4.3 MB. In the world of serverless, that’s a serious red flag. Every time I had to make things work, it involved wrappers, hacks, or half-hearted workarounds that made deployments messy and cold starts worse.

Serverless and Express Don’t Mix Well

In many teams I’ve worked with, the standard approach was a big, monolithic Express app. And every time developers tried to work in parallel, we hit code conflicts. This often slowed development and created complex merge scenarios.

When considering serverless, we often used the “one Lambda per activity” pattern—cleaner, simpler, more manageable. But without structure or scaffolding, building and scaling APIs this way felt like reinventing the wheel.

A Lean Framework Born From Frustration

During a professional break recently, I decided to do something about it. I built a lightweight, Node.js Lambda framework designed specifically for AWS:

🔗 Try it here – http://bz2.in/njsfra

Base size: ~110 KB
After build optimization: Can be trimmed below 60 KB
Philosophy: Lazy loading and per-endpoint modularity

This framework is not just small—it’s structured. It’s optimized for real-world development where multiple developers work across multiple endpoints with minimal overlap.

Introducing cw.js: Scaffolding From OpenAPI

To speed up development, the framework includes a tool called cw.js—a code writer utility that reads a simplified OpenAPI v1.0 JSON definition (like api.json) and creates:

Routing logic
A clean project structure
Separate JS files for each endpoint

Each function is generated as an empty handler—ready for you to add business logic and database interactions. Think of it as automatic boilerplate—fast, reliable, and consistent.

You can generate the OpenAPI definition using an LLM like ChatGPT or Gemini. For example:

Prompt:
Assume the role of an expert JSON developer.
Create the following API in OpenAPI 1.0 format:
[Insert plain-language API description]

Why This Architecture Works for Teams

No more code conflicts: Each route is its own file
Truly parallel development: Multiple devs can work without stepping on each other
Works on low-resource devices: Even a smartphone with Termux/Tmux can run this (see: tmux video)

The Magic of Lazy Loading

Lazy loading means the code for a specific API route only loads into memory when it’s needed. For AWS Lambda, this leads to:

✅ Reduced cold start time
✅ Lower memory usage
✅ Faster deployments
✅ Smaller, scalable codebase

Instead of loading the entire API, the Lambda runtime only parses the function being called—boosting efficiency.

Bonus: PHP Version Also Available

If PHP is your stack, I’ve built something similar:

PHP Micro Framework: https://github.com/jthoma/phpmf
Stub Generator Tool: https://github.com/jthoma/phpmf-api-stub-generator

The PHP version (cw.php) accepts OpenAPI 3.0 and works on similar principles.

Final Thoughts

I built this framework to solve my own problems—but I’m sharing it in case it helps you too. It’s small, fast, modular, and team-friendly—ideal for serverless development on AWS.

If you find it useful, consider sharing it with your network.

👉 Framework GitHub
👉 Watch the dev setup on mobile

AWS DynamoDB bulk migration between regions was a real pain.

Go and try searching for “migrate 20 dynamodb tables from singapore to Mumbai” on google and sure that you will get mostly migrating between accounts. But the real pain is that even though the documents say that full backup and restore is possible, the table has to be created with all the inherent configurations and when number of tables increases like 10 to 50 it becomes a real headache. I am attempting to automate this to the maximum extend possible using couple of shell scripts and a javascript code to rewrite exported json structure to that of a structure that can be taken by create option in the aws cli v2.

See the rest for real at the github repository

This post is Kept in Short and Simple format to transfer all importance to the github code release.

Car Dash Cam to Facebook Reels – An interesting technology journey.

Well, it started to be a really interesting technology journey as I am a core and loyal Ubuntu Linux user. On top of that I always am on the lookout to sharpen my DevOps instincts and skillset. Some people do say that it is because that I am quite lazy to do repetitive tasks the manual way. I don’t care about these useless comments. The situation is that like all car dash cameras, this one also will record any activity in front or back of the car at a decent resolution of 1280 × 720 but as one file each 5 minute. The system’s inherent bug was that it won’t unmount the sdcard properly; hence, to get the files, it need to be mounted on a Linux USB sdcard reader. The commands that I used to combine and overlay these files were combined and formatted into a shell script as follows:

#!/bin/bash

 find ./1 -type f -size +0 | sort > ./fc.txt
 sed -i -e 's#./#file #' ./fc.txt 

 find ./2 -type f -size +0 | sort > ./bc.txt
 sed -i -e 's#./#file #' ./bc.txt 
 
 ffmpeg -f concat -safe 0 -i ./bc.txt -filter:v "crop=640:320:0:0,hflip"  bc.mp4
ffmpeg -f concat -safe 0 -i ./fc.txt -codec copy -an  fc.mp4

ffmpeg -i fc.mp4 -i bc.mp4 -filter_complex "[1:v]scale=in_w:-2[over];[0:v][over]overlay=main_w-overlay_w-50:50" -c:v libx264 "combined.mp4"

To explain the above shell script, the find (./1 and ./2) dash cam saves front cam files in “./1” and rear cam files in “./2” and the filters make sure only files with minimum size greater than 0 will be listed and as the filenames are timestamp based the sort will do its job. The sorted listing is written into fc.txt and then sed used to stamp each filename with a text “file” at the begening which is required for ffmpeg to combine a list of files. The lines 3 and 4 does the sequential combine of rear cam and front cam files and the final one resizes the rear cam file and inset over the front cam file at a calculated width from right side top offset of 50 pixels. This setup was working fine till recently when the car was parked for a long period in very hot area when the camera mount which was using a kind of suction to the windscreen failed and the camera came loose, destroying the touch screen and functionality. As I had already been hooked to the dashcam footage, I got a mobile mount and started using my Galaxy M14 mounted to the windscreen.

Now there is only one camera and that is the front one, but I start the recording before engaging gears from my garage and then stop it only after coming to a full halt at the destination. This is my policy and I don’t want to get distracted while driving. Getting a facebook reel of 9:16 and less than 30 seconds from this footage is not so tough as I need to crop only 405×720 but the frame start location in pixels as well as the timespan is critical. This part I am doing manually. Then it is just a matter of ffmpeg crop filter.

ffmpeg <input> -ss <start> -t <duration> -vf crop=405:720:600:0 -an <output>

In the above command, crop=width:height:x:y is the format and this was okay until the interesting subject was at a relative stable position. But sometimes ther subject will move from left to right and cropping has to happen in a pan motion. For this I chose the hard way.

  1. Crop the interesting portion of the video by timeline without resolution change.
  2. Split frames into png files ffmpeg <input> %04d.png as long as frames are less than 1000 (duration * 30) 4 should be okay if not the padding has to be increased.
  3. Create a pan frame configuration in a text file with framefile x y on each line.
  4. Use image magic convert by looping through the above file say pos.txt
cat pos.txt | while read fn x y ; do convert ff/$fn -crop 405x720+$x+$y gg/$fn

Once this is completed, then use the following command to create the cropped video with pan effect.

ffmpeg -i ff/%04d.png -r 30 cropped.mp4

Well by this weekend I had the urge to enhance it a bit more, with a running clock display along the top or bottom of every post-processed video. For the same after some thoughts I created an html page with some built in preference tweaks saving all such tweaks into localstore effectively avoiding any serverside database or the sort. I have been benefitted by the Free and Open Source movement, and I feel it is my commitment to provide back. Hence the code is hosted on AWS S3 website with no restriction. Check out the mock clock display and if interested view the source also.

With the above said html, a running clock display starting from a timestamp and runs for a supplied duration with selected background and foreground colors and font size etc is displayed on the browser. I capture this video using OBS on my laptop, builtin screen recorder on my Samsung Galaxy Tab S7 FE and then use ffmpeg to crop the exact time display from the full screen video. This video is also split into frames and corresponding frames overlayed on top of the reel clip frame also using convert and the pos.txt for the filenames.

cat pos.txt | while read fn x y ; do convert gg/$fn tt/$fn -gravity North -composite gt/$fn ; done

The gravity – “North” places the second input at the top of the first input whereas “South” will place at the bottom, similarly “East” and “West” and “Center” is also available.

Built a Feature-Rich QR Code Generator with Generative AI and JavaScript

In today’s digital world, QR codes have become ubiquitous. From restaurant menus to product packaging, these scannable squares offer a convenient way to access information. This article details the creation of a versatile QR code generator that leverages the power of generative AI and JavaScript for a seamless user experience, all within the user’s environment.

Empowering Development with Generative AI

The project began by utilizing generative AI tools to generate boilerplate code. This innovative approach demonstrates the potential of AI to streamline development processes. Prompts are used to create a foundation, allowing developers to focus on implementing advanced functionalities.

Generative AI Coding primer

Open Google Gemini and type the following

Assume the role of a HTML coding expert <enter>

Watch for the response, and if it is positive, go ahead and continue to tell it what you want. Actually for this project the next prompt I gave was:

Show me an HTML boiler plate starter with Bootstrap and JQquery linked from public cdn libraries.

Then for each element, the correct description was suggested, like adding form, text input, further reset button, submit button, and download button initially hidden. The rest of the functionality was very easy with qrcodejs library and further new chat with role setting.

Assume the role of a JavaScript programmer with hefty JQuery experience.

Further prompts were curated to get the whole builder ready still I had to use a bit of my expertise and commonsense, while local testing was done using the node js utility HTTP-server which was installed with Gemini’s suggested command.

prompt:

node http server install

from the response:

npm install http-server -g

Key Functionalities

The QR code generator boasts several user-friendly features, all processed entirely on the client-side (user’s device):

  • Phone Number Validation and WhatsApp Integration:
    • Users can input phone numbers, and the code validates them using regular expressions.
    • Validated numbers are converted into WhatsApp direct chat links, eliminating the need for external servers and simplifying communication initiation.
  • QR Code Generation for Phone Calls:
    • The application generates QR codes that trigger phone calls when scanned by a mobile camera when provided with the proper intent URL. tel://<full mobile number>
    • This is a practical solution for scenarios like displaying contact information on a car, without ever sending your phone number outside your device.

Technical Deep Dive

The project leverages the following technologies, emphasizing the client-side approach:

  • Client-Side Functionality with JavaScript:
    • This eliminates the need for a server, making the application fast, efficient, and easy to deploy. Users experience no delays while generating QR codes, and all processing stays within their browser.
  • AWS S3 Website Delivery:
    • Cost-effective and scalable hosting for the static website ensures smooth operation. S3 simply serves the application files, without any server-side processing of user data.
  • AWS CloudFront for Global Edge Caching and Free SSL:
    • CloudFront enhances performance by caching static content closer to users globally, minimizing latency. Free SSL certification guarantees secure communication between users and your website, even though no user data is transmitted.
    • Please visit review and comment on my QR Code Generator, the known bug in some mobile phones is the download fails, which I will see to as soon as possible, if that is the case with your phone take a screenshot and crop it up for the time being. On Samsung devices I think the power button and volume down pressed together would take a screenshot.

Export Cloudwatch Logs to AWS S3 – Deploy using SAM

With due reference to the blog which helped me in the right direction, the Tensult blogs article Exporting of AWS CloudWatch logs to S3 using Automation, though at some points I have deviated from the original author’s suggestion.

Some points are blindly my preference and some other due to the suggested best practices. I do agree that starters, would be better off with setting IAM policies with ‘*’ in the resource field. But when you move things into production it is recommended to use least required permissions. Also, some critical policies were missing from the assume role policy. Another unnecessary activity was the checking of the existence of s3 bucket and attempt to create if not exists, at each repeated execution. Again for this purpose the lambda role needed create bucket permission. All these were over my head, and the outcome is this article.

Well if you need CloudWatch logs to be exported to S3 for whatever reason, this could save your time a lot, though this needs to be run in every different region where you need to deploy the stack. Please excuse me as the whole article expects to have aws-cli and sam-cli pre-installed.

Continue reading “Export Cloudwatch Logs to AWS S3 – Deploy using SAM”

Javascript API Credentials – Just a port

There is not much to write than to attribute the logic up to a post on online code generator. Well since this was written in php and I needed the same in javascript, there was some cutting corners, and finally the script which is attached came up.

randomstring


The vars defined hold the two array of strings, and the function generates the key. Calling the function with genKey(16, access_salt) will generate a 16 char random string from the defined array access_salt.

Download

Linux CPU usage and montioring using shell memcache and jquery

Recently in a project where the application was deployed across multiple servers, the Client QA as well as Support Team wanted a better monitoring of all the servers in the production. It was too much to provide everybody with shell access and ask them to monitor using top. Well after a lot of digging through the wonderful search index of Google. And with insights from Paul Colby vide his article Calculating CPU Usage from /proc/stat, and various comments of Memcache usage through telnet along with the /dev/tcp socket connections it was just a matter of using some nifty shell processing before I could store each machine cpu values, loadavg, and running tasks as a json encoded string into memcache on one of the hosts with hostname as the key.
Continue reading “Linux CPU usage and montioring using shell memcache and jquery”

Getting datetime type into JavaScript as Date object

When selecting datetime to be displayed in a JavaScript ui library, select the unix_timestamp * 1000 from the sql

This is not any new thing and may be discussed at different other places. But just as I came across like any other things, I just wanted to make a record of this.

When selecting datetime to be displayed in a JavaScript ui library, select the unix_timestamp * 1000 from the sql.
Continue reading “Getting datetime type into JavaScript as Date object”

Prototype based date picker

We had started optimizing drive for the projects of Reserway Technologies, and the work being done on the demo site. For the initial prototype, we used a dual datepicker developed in flex, which interacts with the html using javascript calls. We used this because the component was already available, and just adding a couple of handlers could do our job, and we could concentrate more on the abstraction of GDS integration. Well we are in a state where the backend is almost stable and we need more performance drive on the frontend. The first choice was ofcouse linking the libraries to google cdn. Then started cutting the curves. The biggest bottleneck was the whopping 220Kb for the flash control. I was particular to use a simple datepicker, which could be styled using css, and would be better if used the prototype library.
Continue reading “Prototype based date picker”

protoype.js: Deep Category Select; Ajax

I was experimenting with the prototype.js library, thanks to all who have contributed towards this, and the wonderful documentations avaliable as download, as well as online references.

For a multilevel hierarchical selector of category, where the top levels should not be selectable, the existing ui elements were not enough to show off, with out incurring ambiguity. This led me to do the basic tests, and finalized the said widget. It does not support much now, though I may be working on a extension which will support multi-select.

See the Deep Category Select, in action where it is embedded into an example.

Category Selector by jiju-saturn