From Zero to Kubernetes: Automating a Minimal Cluster on AWS EC2 (My DevOps Journey)

The Unofficial Challenge: Why Automate Kubernetes on AWS?

Ever wondered if you could spin up a fully functional Kubernetes cluster on AWS EC2 with just a few commands? Four years ago, during my DevOps Masters Program, I decided to make that a reality. While the core assignment was to learn Kubernetes (which can be done in many ways), I set myself an ambitious personal challenge: to fully automate the deployment of a minimal Kubernetes cluster on AWS EC2, from instance provisioning to node joining.

Manual Kubernetes setups can be incredibly time-consuming, prone to errors, and difficult to reproduce consistently. I wanted to leverage the power of Infrastructure as Code (IaC) to create a repeatable, disposable, and efficient way to deploy a minimal K8s environment for learning and experimentation. My goal wasn’t just to understand Kubernetes, but to master its deployment pipeline, integrate AWS services seamlessly, and truly push the boundaries of what I could automate within a cloud environment.

The full github link: https://github.com/jthoma/code-collection/tree/master/aws/aws-cf-kubecluster

The Architecture: A Glimpse Behind the Curtain

At its core, my setup involved an AWS CloudFormation template (managed by AWS SAM CLI) to provision EC2 instances, and a pair of shell scripts to initialize the Kubernetes control plane and join worker nodes.

Here’s a breakdown of the key components and their roles in bringing this automated cluster to life:

AWS EC2: These are the workhorses – the virtual machines that would host our Kubernetes control plane and worker nodes.
AWS CloudFormation (via AWS SAM CLI): This is the heart of our Infrastructure as Code. CloudFormation allows us to define our entire AWS infrastructure (EC2 instances, security groups, IAM roles, etc.) in a declarative template. The AWS Serverless Application Model (SAM) CLI acts as a powerful wrapper, simplifying the deployment of CloudFormation stacks and providing a streamlined developer experience.
Shell Scripts: These were the crucial “orchestrators” running within the EC2 instances. They handled the actual installation of Kubernetes components (kubeadm, kubelet, kubectl, Docker) and the intricate steps required to initialize the cluster and join nodes.

When I say “minimal” cluster, I’m referring to a setup with just enough components to be functional – typically one control plane node and one worker node, allowing for basic Kubernetes operations and application deployments.

The Automation Blueprint: Diving into the Files

The entire orchestration was handled by three crucial files, working in concert to bring the Kubernetes cluster to life:

template.yaml (The AWS CloudFormation Backbone): This YAML file is where the magic of Infrastructure as Code happens. It outlines our EC2 instances, their network configurations, and the necessary security groups and IAM roles. Critically, it uses the UserData property within the EC2 instance definition. This powerful property allows you to pass shell commands or scripts that the instance executes upon launch. This was our initial entry point for automation.

   You can view the `template.yaml` file on GitHub [here](https://www.google.com/search?q=https://github.com/jthoma/code-collection/blob/master/aws/aws-cf-kubecluster/template.yaml).

kube-bootstrap.sh (The Instance Preparation Script): This script is the first to run on our EC2 instances. It handles all the prerequisites for Kubernetes: installing Docker, the kubeadm, kubectl, and kubelet binaries, disabling swap, and setting up the necessary kernel modules and sysctl parameters that Kubernetes requires. Essentially, it prepares the raw EC2 instance to become a Kubernetes node.

   You can view the `kube-bootstrap.sh` file on GitHub [here](https://www.google.com/search?q=https://github.com/jthoma/code-collection/blob/master/aws/aws-cf-kubecluster/kube-bootstrap.sh).

kube-init-cluster.sh (The Kubernetes Orchestrator): Once kube-bootstrap.sh has laid the groundwork, kube-init-cluster.sh takes over. This script is responsible for initializing the Kubernetes control plane on the designated master node. It then generates the crucial join token that worker nodes need to connect to the cluster. Finally, it uses that token to bring the worker node(s) into the cluster, completing the Kubernetes setup.

   You can view the `kube-init-cluster.sh` file on GitHub 

The Deployment Process: sam deploy -g in Action

The entire deployment process, from provisioning AWS resources to the final Kubernetes cluster coming online, is kicked off with a single, elegant command from the project’s root directory:

sam deploy -g

The -g flag initiates a guided deployment. AWS SAM CLI interactively prompts for key parameters like instance types, your AWS EC2 key pair (for SSH access), and details about your desired VPC. This interactive approach makes the deployment customizable yet incredibly streamlined, abstracting away the complexities of direct CloudFormation stack creation. Under the hood, SAM CLI translates your template.yaml into a full CloudFormation stack and handles its deployment and updates.

The “Aha!” Moment: Solving the Script Delivery Challenge

One of the most persistent roadblocks I encountered during this project was a seemingly simple problem: how to reliably get kube-bootstrap.sh and kube-init-cluster.sh onto the newly launched EC2 instances? My initial attempts, involving embedding the scripts directly into the UserData property, quickly became unwieldy due to size limits and readability issues. Other complex methods also proved less than ideal.

After several attempts and a bit of head-scratching, the elegant solution emerged: I hosted both shell scripts in a public-facing downloads folder on my personal blog. Then, within the EC2 UserData property in template.yaml, I simply used wget to download these files to the /tmp directory on the instance, followed by making them executable and running them.

This approach proved incredibly robust and streamlined. It kept the CloudFormation template clean and manageable, while ensuring the scripts were always accessible at launch time without needing complex provisioning tools or manual intervention. It was a classic example of finding a simple, effective solution to a tricky problem.

Lessons Learned and Key Takeaways

This project, born out of an academic requirement, transformed into a personal quest to master automated Kubernetes deployments on AWS. It was a journey filled with challenges, but the lessons learned were invaluable:

Problem-Solving is Key: Technical roadblocks are inevitable. The ability to iterate, experiment, and find creative solutions is paramount in DevOps.
The Power of Infrastructure as Code (IaC): Defining your infrastructure programmatically is not just a best practice; it’s a game-changer for reproducibility, scalability, and disaster recovery.
Automation Principles: Breaking down complex tasks into manageable, automated steps significantly reduces manual effort and error.
AWS CloudFormation and UserData Versatility: Understanding how to leverage properties like UserData can unlock powerful initial setup capabilities for your cloud instances.
Persistence Pays Off: Sticking with a challenging project until it works, even when faced with frustrating issues, leads to deep learning and a huge sense of accomplishment.

While this was a fantastic learning experience, if I were to revisit this project today, I might explore using a dedicated configuration management tool like Ansible for the in-instance setup, or perhaps migrating to a managed Kubernetes service like EKS for production readiness. However, for a hands-on, foundational understanding of automated cluster deployment, this self-imposed challenge was truly enlightening.

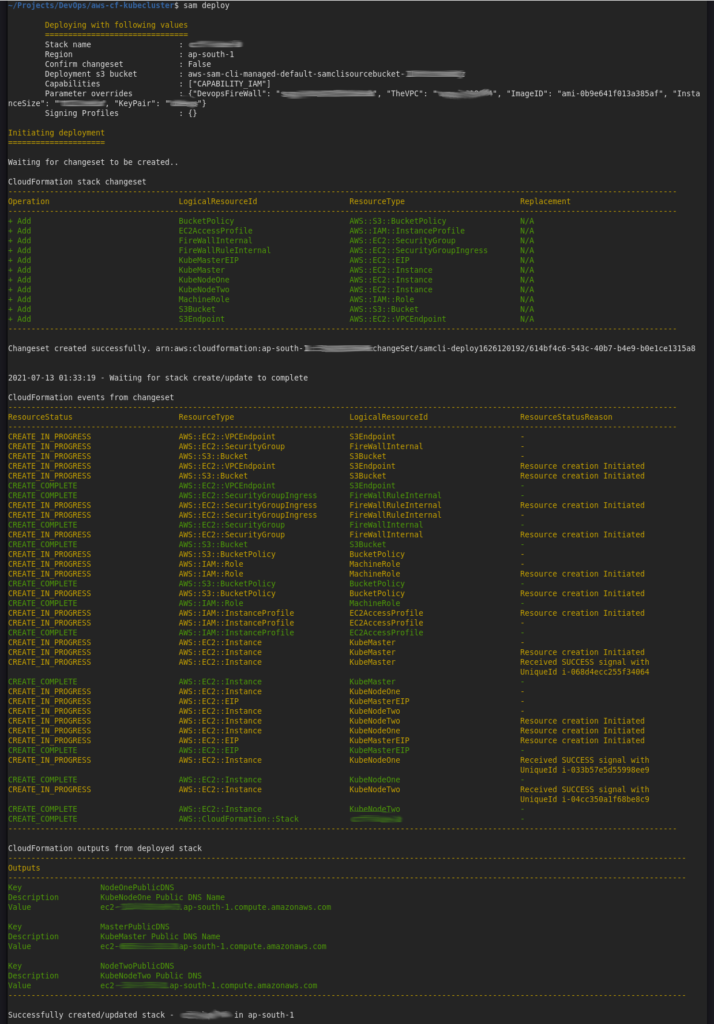
Last time when I ran it the console was as follows:

Conclusion

This project underscored that with a bit of ingenuity and the right tools, even complex setups like a Kubernetes cluster can be fully orchestrated and deployed with minimal human intervention. It’s a testament to the power of automation in the cloud and the satisfaction of bringing a challenging vision to life.

I hope this deep dive into my automated Kubernetes cluster journey has been insightful. Have you embarked on similar automation challenges? What unique problems did you solve? Share your experiences in the comments!

Unleashing Cloud Power on the Go: My Portable Development Studio with Termux and AWS

In today’s fast-paced tech world, flexibility and portability are paramount. As a developer, I’ve always sought a setup that allows me to code, manage cloud resources, and analyze data from anywhere. Recently, I’ve crafted a powerful and portable development environment using my Samsung Galaxy Tab S7 FE, Termux, and Amazon Web Services (AWS).

The Hardware: A Tablet Turned Powerhouse

My setup revolves around the Samsung Galaxy Tab S7 FE, paired with its full keyboard book case cover. This tablet, with its ample screen and comfortable keyboard, provides a surprisingly effective workspace. The real magic, however, lies in Termux.

Termux: The Linux Terminal in Your Pocket

Termux is an Android terminal emulator and Linux environment app that brings the power of the command line to your mobile device. I’ve configured it with essential tools like:

ffmpeg: For multimedia processing.
ImageMagick: For image manipulation.
Node.js 22.0: For JavaScript development.
AWS CLI v2: To interact with AWS services.
AWS SAM CLI: For serverless application development.

AWS Integration: Cloud Resources at Your Fingertips

To streamline my AWS interactions, I’ve created a credentials file within Termux. This file stores my AWS access keys, region, security group, SSH key path, and account ID, allowing me to quickly source these variables and execute AWS commands.

export AWS_DEFAULT_REGION=[actual region id]
export AWS_ACCESS_KEY_ID=[ACCESS KEY From Credentials]
export AWS_SECRET_ACCESS_KEY=[SECRET KEY from Credentials]
export AWS_SECURITY_GROUP=[a security group id which I have attached to my ec2 instance]
export AWS_SSH_ID=[path to my pem key file]
export AWS_ACCOUNT=[The account id from billing page]

source [path to the credentials.txt]

In the above configuration the security group id is actually used for automatically patching with my public ip with blanket access using shell commands.

  currentip=$(curl --silent [my own what-is-my-ip clone - checkout the code ])
  aws ec2 describe-security-groups --group-id $AWS_SECURITY_GROUP > ~/permissions.json
  grep CidrIp ~/permissions.json | grep -v '/0' | awk -F'"' '{print $4}' | while read cidr;
   do
     aws ec2 revoke-security-group-ingress --group-id $AWS_SECURITY_GROUP --ip-permissions "FromPort=-1,IpProtocol=-1,IpRanges=[{CidrIp=$cidr}]"
   done   
  aws ec2 authorize-security-group-ingress --group-id $AWS_SECURITY_GROUP --protocol "-1" --cidr "$currentip/32"

The what-is-my-ip code on github

With this setup, I can seamlessly SSH into my EC2 instances:

ssh -o "UserKnownHostsFile=/dev/null" -o "StrictHostKeyChecking=no" -o IdentitiesOnly=yes -i $AWS_SSH_ID ubuntu@13.233.236.48 -v

This allows me to execute intensive tasks, such as heavy PHP code execution and log analysis using tools like Wireshark, remotely.

EC2 Instance with Auto-Stop Functionality

To optimize costs and ensure my EC2 instance isn’t running unnecessarily, I’ve implemented an auto-stop script. This script, available on GitHub ( https://github.com/jthoma/code-collection/tree/master/aws/ec2-inactivity-shutdown ), runs every minute via cron and checks for user logout or network disconnects. If inactivity exceeds 30 seconds, it automatically shuts down the instance.

Why This Setup Rocks

Portability: I can work from anywhere with an internet connection.
Efficiency: Termux provides a powerful command-line environment on a mobile device.
Cost-Effectiveness: The auto-stop script minimizes EC2 costs.
Flexibility: I can seamlessly switch between local and remote development.

Visuals

Conclusion

My portable development setup demonstrates the incredible potential of combining mobile technology with cloud resources. With termux and AWS, I’ve created a powerful and flexible environment that allows me to code and manage infrastructure from anywhere. This setup is perfect for developers who value portability and efficiency.

Globals vs. Constants: The Database Connection String Showdown in a PHP World

In the PHP world, we often encounter the age-old debate: globals vs. constants. This discussion pops up in various contexts, and one common battleground is how we store configuration values, especially sensitive ones like database connection strings. Should we use a global variable like $dsn or a defined constant like MySQL_DSN? Let’s dive into this, focusing on the specific example of a Data Source Name (DSN) for database connections.

The Contenders:

Global Variable ($dsn): A global variable, in this case, $dsn = "mysql://user:password@serverip/dbname", is declared in a scope accessible throughout your application.

Defined Constant (MySQL_DSN): A constant, defined using define('MySQL_DSN','mysql://user:password@serverip/dbname'), also provides application-wide access to the value.

The Pros and Cons:

Analysis:

Mutability: Constants are immutable. Once defined, their value cannot be changed. This can be a significant advantage for security. Accidentally or maliciously modifying a database connection string mid-execution could have disastrous consequences. Globals, being mutable, are more vulnerable in this respect.

Scope: While both can be accessed globally, constants often encourage a more controlled approach. They are explicitly defined and their purpose is usually clearer. Globals, especially if used liberally, can lead to code that’s harder to reason about and maintain.

Security: The immutability of constants provides a slight security edge. It reduces the risk of the connection string being altered unintentionally or maliciously. However, neither approach inherently protects against all vulnerabilities (e.g., if your code is compromised). Proper input sanitization and secure coding practices are always essential.

Readability: Constants, by convention (using uppercase and descriptive names), tend to be more readable. MySQL_DSN clearly signals its purpose, whereas $dsn might require looking at its initialization to understand its role.

Performance: The performance difference between accessing a global variable and a defined constant is negligible in modern PHP. Don’t let performance be the deciding factor here.

Abstracting the MySQL Client Library:

Lets discuss about abstracting the MySQL client library. This is a fantastic idea, regardless of whether you choose globals or constants. Using an abstraction layer (often a class) allows you to easily switch between different database libraries (e.g., MySQLi, PDO) or even different connection methods without rewriting large portions of your application.

Here’s a basic example (using PDO, but the concept applies to other libraries):

class Database {
    private static $pdo;

    public static function getConnection() {
        if (!isset(self::$pdo)) {
            $dsn = defined('MySQL_DSN') ? MySQL_DSN : $GLOBALS['dsn']; // Check for constant first
            try {
                self::$pdo = new PDO($dsn);
                self::$pdo->setAttribute(PDO::ATTR_ERRMODE, PDO::ERRMODE_EXCEPTION); // Good practice!
            } catch (PDOException $e) {
                die("Database connection failed: " . $e->getMessage());
            }
        }
        return self::$pdo;
    }
}

// Usage:
$db = Database::getConnection();
$stmt = $db->query("SELECT  FROM users");
// ... process results ...

Recommendation:

Definable constants are generally the preferred approach for database connection strings. Their immutability and improved readability make them slightly more secure and maintainable. Combine this with a well-designed database abstraction layer, and you’ll have a robust and flexible system.

Further Considerations:

Environment Variables: Consider storing sensitive information like database credentials in environment variables and retrieving them in your PHP code for production environments. This is a more secure way to manage configuration.
Configuration Files: For more complex configurations, using configuration files (e.g., INI, YAML, JSON) can be a better approach.

Using separate boolean constants like MYSQL_ENABLED and PGSQL_ENABLED to control which database connection is active is a very good practice. It adds another layer of control and clarity. And, as you pointed out, the immutability of constants is a crucial advantage for configuration values.

Here’s how you could integrate that into the previous example, along with some improvements:

<?php

// Configuration (best practice: store these in environment variables or a separate config file)
define('MYSQL_ENABLED', getenv('MYSQL_ENABLED') ?: 0); // Use getenv() for environment variables, fallback to 0
define('MYSQL_DSN', getenv('MYSQL_DSN') ?: 'user:password@server/database');  // Fallback value for development
define('PGSQL_ENABLED', getenv('PGSQL_ENABLED') ?: 0);
define('PGSQL_DSN', getenv('PGSQL_DSN') ?: 'user:password@server/database');

class Database {
    private static $pdo;
    private static $activeConnection; // Track which connection is active

    public static function getConnection() {
        if (!isset(self::$pdo)) {
            if (MYSQL_ENABLED) {
                $dsn = MYSQL_DSN;
                $driver = 'mysql';  // Store the driver for later use
                self::$activeConnection = 'mysql';
            } elseif (PGSQL_ENABLED) {
                $dsn = PGSQL_DSN;
                $driver = 'pgsql';
                self::$activeConnection = 'pgsql';
            } else {
                die("No database connection enabled."); // Handle the case where no connection is configured.
            }

            try {
                self::$pdo = new PDO($driver.':'.$dsn); // Include the driver in the DSN string.
                self::$pdo->setAttribute(PDO::ATTR_ERRMODE, PDO::ERRMODE_EXCEPTION);
                // More PDO settings if needed (e.g., charset)
            } catch (PDOException $e) {
                die("Database connection failed: " . $e->getMessage());
            }
        }
        return self::$pdo;
    }

    public static function getActiveConnection() {  // Added a method to get the active connection type
        return self::$activeConnection;
    }
}


// Example usage:
$db = Database::getConnection();

if (Database::getActiveConnection() === 'mysql') {
    // MySQL specific operations
    $stmt = $db->query("SELECT  FROM users");
} elseif (Database::getActiveConnection() === 'pgsql') {
    // PostgreSQL specific operations
    $stmt = $db->query("SELECT  FROM users"); // Example: Adapt query if needed.
}

// ... process results ...

?>

Analyzing the above code snippet, there are few key improvements:

Environment Variables: Using getenv() is the recommended approach for storing sensitive configuration. The fallback values are useful for development but should never be used in production.
Driver in DSN: Including the database driver (mysql, pgsql, etc.) in the DSN string ($driver.':'.$dsn) is generally the preferred way to construct the DSN for PDO. It makes the connection more explicit.
Active Connection Tracking: The $activeConnection property and getActiveConnection() method allow you to easily determine which database type is currently being used, which can be helpful for conditional logic.
Error Handling: The die() statement now provides a more informative message if no database connection is enabled. You could replace this with more sophisticated error handling (e.g., logging, exceptions) in a production environment.
Clearer Configuration: The boolean constants make it very clear which database connections are enabled.

Using a .env file (or similar mechanism) combined with environment variable sourcing is a fantastic way to manage different environments (development, testing, staging, production) on a single machine or AWS EC2 instance. It drastically reduces the risk of accidental configuration errors and simplifies deployment process.

Here’s a breakdown of why this approach is so effective:

Benefits of .env files and Environment Variable Sourcing:

Separation of Concerns: Configuration values are separated from your application code. This makes your code more portable and easier to maintain. You can change configurations without modifying the code itself.
Environment-Specific Settings: Each environment (dev, test, prod) can have its own .env file with specific settings. This allows you to easily switch between environments without manually changing configuration values in your code.
Security: Sensitive information (API keys, database passwords, etc.) is not stored directly in your codebase. This is a significant security improvement.
Simplified Deployment: When deploying to a new environment, you just need to copy the appropriate .env file to the server and source it. No need to modify your application code.
Reduced Administrative Errors: By automating the process of setting environment variables, you minimize the risk of human error. No more manually editing configuration files on the server.
Version Control: You can exclude the .env file from version control (using .gitignore) to prevent sensitive information from being accidentally committed to your repository. However, it’s a good practice to include a .env.example file with placeholder values for developers to use as a template.

How it Works:

  1. .env File: You create a .env file in the root directory of your project. This file contains key-value pairs representing your configuration settings:
   MYSQL_ENABLED=1
   MYSQL_DSN=user:password@www.jijutm.com/database_name
   API_KEY=your_secret_api_key
   DEBUG_MODE=true
  1. Sourcing the .env file: You need a way to load the variables from the .env file into the server’s environment. There are several ways to do this: source .env (Bash): In a development or testing environment, you can simply run source .env in your terminal before running your PHP scripts. This will load the variables into the current shell’s environment. dotenv Library (PHP): For production environments, using a library like vlucas/phpdotenv is recommended. This library allows you to load the .env file programmatically in your PHP code: <?php require_once __DIR__ . '/vendor/autoload.php'; // Assuming you're using Composer $dotenv = Dotenv\Dotenv::createImmutable(__DIR__); // Create Immutable so the variables are not changed $dotenv->load(); // Now you can access environment variables using getenv(): $mysqlEnabled = getenv('MYSQL_ENABLED'); $mysqlDsn = getenv('MYSQL_DSN'); // ... ?> Web Server Configuration: Some web servers (like Apache or Nginx) allow you to set environment variables directly in their configuration files. This is also a good option for production.
  2. Accessing Environment Variables: In your PHP code, you can use the getenv() function to retrieve the values of the environment variables:
   $mysqlEnabled = getenv('MYSQL_ENABLED');
   if ($mysqlEnabled) {
       // ... connect to MySQL ...
   }

Example Workflow:

  1. Development: Developer creates a .env file with their local settings and runs source .env before running the application.
  2. Testing: A .env.testing file is created with the testing environment’s settings. The testing script sources this file before running tests.
  3. Production: The production server has a .env file with the production settings. The web server or a deployment script sources this file when the application is deployed.

By following this approach, you can create a smooth and efficient workflow for managing your application’s configuration across different environments. It’s a best practice that significantly improves the maintainability and security of your PHP applications.

Get My IP and patch AWS Security Group

My particular use case was that In my own AWS Account where I do most of the R&D I had one security group which was only for me doing SSH into EC2 instances. Way back in 2020 during pandemic season, had to go freelance for sometime while in notice period with one company and in negotiation with another one. Well this time I was mostly connected from mobile hotspot switching from JIO on Galaxy M14 to Airtel on Galaxy A54 and BSNL on second sim of M14 and this was causing my security group update a real pain.

Basically being lazy and having devops and automation since long back. Started working on an idea an the outcome was an AWS Serverless clone of what is my ip service which is named echo my ip. Check it out on github. The nodejs code and aws sam template to deploy is given over there.

Next using the standard Ubuntu terminal text editor added the following to the .bash_aliases file.

sgupdate()
{
  currentip=$(curl --silent https://{api gateway url}/Prod/ip/)
  /usr/local/bin/aws ec2 describe-security-groups --group-id $AWS_SECURITY_GROUP > /dev/shm/permissions.json
  grep CidrIp /dev/shm/permissions.json | grep -v '/0' | awk -F'"' '{print $4}' | while read cidr;
   do
     /usr/local/bin/aws ec2 revoke-security-group-ingress --group-id $AWS_SECURITY_GROUP --ip-permissions "FromPort=-1,IpProtocol=-1,IpRanges=[{CidrIp=$cidr}]"
   done   
  /usr/local/bin/aws ec2 authorize-security-group-ingress --group-id $AWS_SECURITY_GROUP --protocol "-1" --cidr "$currentip/32"
}

alias aws-permit-me='sgupdate'

I already have a .env file for every project I am handling and a cd command will check for existance of .env and source it in case it exists.

cwd(){
  cd $1
  if [ -f .env ] ; then
    . .env
  fi
}

alias cd='cwd'

The env file is of structure as follows with coresponding values after the ‘=’ ofcourse.

export AWS_DEFAULT_REGION=
export AWS_ACCESS_KEY_ID=
export AWS_SECRET_ACCESS_KEY=
export AWS_SECURITY_GROUP=
export AWS_SSH_ID=
export AWS_ACCOUNT=

It’s a common problem for people working from home with dynamic IPs to manage firewall rules. Automating the process with a serverless function and a shell alias is a great way to simplify things. Sharing on github is to help others and provide back to the community.

This method provides some advantages

  • Automation: Eliminates the tedious manual process of updating security group rules.
  • Serverless: Cost-effective, as you only pay for the compute time used.
  • Shell Alias: Provides a convenient and easy-to-remember way to trigger the update.
  • GitHub Sharing: Makes the solution accessible to others.
  • Secure: Security Group Modification uses aws cli and credentials in terminal environment

AWS DynamoDB bulk migration between regions was a real pain.

Go and try searching for “migrate 20 dynamodb tables from singapore to Mumbai” on google and sure that you will get mostly migrating between accounts. But the real pain is that even though the documents say that full backup and restore is possible, the table has to be created with all the inherent configurations and when number of tables increases like 10 to 50 it becomes a real headache. I am attempting to automate this to the maximum extend possible using couple of shell scripts and a javascript code to rewrite exported json structure to that of a structure that can be taken by create option in the aws cli v2.

See the rest for real at the github repository

This post is Kept in Short and Simple format to transfer all importance to the github code release.

Optimizing WordPress Performance with AWS, Docker and Jenkins

At Jijutm.com, I wanted to deliver a fast and reliable experience for our readers. To achieve this, I have implemented a containerized approach using Docker and Jenkins for managing this WordPress site. This article delves into the details of our setup and how it contributes to exceptional website performance.

Why Containers?

Traditional server management often involves installing software directly on the operating system. This can lead to dependency conflicts, versioning issues, and a complex environment. Docker containers provide a solution by encapsulating applications with all their dependencies into isolated units. This offers several advantages:

Consistency: Docker ensures a consistent environment regardless of the underlying operating system. This simplifies development, testing, and deployment.
Isolation: Applications running in containers are isolated from each other, preventing conflicts and improving security.
Portability: Docker containers are portable across different environments, making it easy to migrate your application between development, staging, and production.

The Containerized Architecture

This WordPress site leverages three Docker containers:

  1. Nginx: A high-performance web server that serves the content of this website efficiently.
  2. PHP-FPM: A FastCGI process manager that executes PHP code for dynamic content generation in WordPress.
  3. MariaDB: A robust and popular open-source relational database management system that stores the WordPress data and is fully compatible with MySQL.

These containers work together seamlessly to deliver a smooth user experience. Nginx acts as the front door, handling user requests and routing them to the PHP-FPM container for processing. PHP-FPM interacts with the MariaDB container to retrieve and update website data.

Leveraging Jenkins for Automation

While Docker simplifies application management, automating deployments is crucial for efficient workflow. This is where Jenkins comes in. Jenkins is an open-source automation server that we use to manage the build and deployment process for our WordPress site.

Here’s how Jenkins integrates into this workflow:

  1. Code Changes: Whenever we make changes to the WordPress codebase, we push them to a version control system like Git.
  2. Jenkins Trigger: The push to the Git repository triggers a job in Jenkins.
  3. Build Stage: Jenkins pulls the latest code, builds a new Docker image containing the updated WordPress application, and pushes it to a Docker registry.
  4. Deployment Stage: The new Docker image is deployed to our hosting environment, updating the running containers with the latest code.

This automation ensures that our website stays up-to-date with the latest changes without any manual intervention.

Hooked into WordPress Post or Page Publish.

Over and above maintaining the code using Jenkins, each content Publish action triggers another Jenkins project, which runs a sequence of commands. wget in mirror mode to convert the whole site to static HTML files. sed to rewrite the URLs from local host to realtime external domain specific. gzip to create .html.gz for each HTML files. aws cli to sync the static mirror folder with that in AWS S3 and finally apply meta headers to the files to specify the content type and content-encoding. When all the files are synced, the AWS CLI issues an invalidate request to the CloudFront distribution.

Benefits of this Approach

Improved Performance: Docker containers provide a lightweight and efficient environment, leading to faster loading times for this website.
Enhanced Scalability: I don’t need to bother about scaling this application by adding more containers to handle increased traffic, as that is handled by aws S3 and CloudFront.
Simplified Management: Docker and Jenkins automate a significant portion of the infrastructure management, freeing up time for development and content creation. With the docker and all components running in my Asus TUF A17 Laptop powered by XUbuntu the hosting charges are limited to AWS Route53, AWS S3 and AWS CloudFront only.
Reliable Deployments: Jenkins ensures consistent and reliable deployments, minimizing the risk of errors or downtime.
Well for minimal dynamic content like the download counters, AWS Serverless lambda functions are written and deployed for updating download requests into aDynamoDB table and to display the count near any downloadable content with proper markup. Along with this the comments are moved into Disqus, as it is a comment system that can be used on WordPress sites. It can replace the native WordPress comments system.

Conclusion

By leveraging Docker containers and Jenkins, I have established a robust and performant foundation for this site. This approach allows me to focus on delivering high-quality content to the readers while ensuring a smooth and fast user experience.

Additional Considerations

Security: While Docker containers enhance security, it’s essential to maintain secure practices like keeping Docker containers updated and following security best practices for each service.
Monitoring: Monitoring the health and performance of your containers is crucial. Tools like Docker Stats and Prometheus can provide valuable insights.

Hope this article provides a valuable perspective on how Docker and Jenkins can be used to optimize a WordPress website. If you have any questions, feel free to leave a comment below!

Tackling Privilege Escalation in AWS – A Real-World Solution

The Challenge of Privilege Escalation
Cloud security is one of the most pressing concerns for organizations leveraging AWS. Among these concerns, Privilege Escalation Attacks pose a critical risk. In these attacks, a malicious user or compromised identity can exploit misconfigured permissions to gain elevated access, jeopardizing data integrity and security.

In this post, I explore a real-world privilege escalation scenario and outline an effective solution using AWS services and best practices.

The Scenario: A Misconfigured IAM Policy

Imagine a medium-sized organization with a DevOps team that requires administrative privileges to manage infrastructure. To simplify permissions, an administrator attaches a wildcard (`*`) to an IAM policy, granting full access to certain services without proper scoping.

A malicious actor gains access to an unused account in the organization, exploiting the over-permissive policy to create a custom role with admin privileges. From there, the attacker gains unrestricted access to sensitive resources like databases and S3 buckets.

Impact:

  • Exposure of sensitive data.
  • Manipulation or deletion of infrastructure.
  • Financial damage due to misuse of compute resources. The Solution: Mitigating Privilege Escalation Risks

To counter this, we can implement a robust multi-layered approach using AWS services and industry best practices:

  1. Principle of Least Privilege (POLP)
    Review and Refine IAM Policies: Replace wildcards (`) with specific actions and resources. For example, instead of grantings3:, use actions likes3:PutObjectands3:GetObject`.
    IAM Access Analyzer: Use this tool to analyze resource policies and detect over-permissive configurations.

2. Enable Identity Protection with MFA
Multi-Factor Authentication (MFA): Enforce MFA for all IAM users and roles, especially for sensitive accounts. Use AWS IAM Identity Center for centralized management.

3. Monitor and Detect Anomalous Behavior
AWS CloudTrail: Ensure logging is enabled for all AWS accounts to track actions like policy changes and resource creation.
Amazon GuardDuty: Use GuardDuty to detect potential privilege escalation attempts, such as unauthorized role creation.

4. Implement Permission Boundaries
Define permission boundaries for IAM roles to restrict the maximum allowable permissions. For example, restrict developers to actions within specific projects or environments.

5. Automate Security Audits
AWS Config: Set up rules to evaluate the compliance of IAM policies and other configurations. Use automated remediation workflows for non-compliant resources.
AWS Security Hub: Aggregate security alerts and compliance checks for centralized visibility.

The Result: Strengthened Cloud Security

By adopting these measures, the organization effectively neutralized the threat of privilege escalation. The team can now operate confidently, knowing that any deviation from least privilege will trigger immediate alerts and automated actions.

Conclusion

Cloud security is a shared responsibility, and mitigating privilege escalation is crucial for safeguarding your AWS environment. Regular audits, careful policy design, and leveraging AWS security tools can create a resilient cloud infrastructure.

Call to Action
Secure your AWS workloads with these strategies today. Got questions or need assistance? Feel free to reach out or share your thoughts in the comments below!

Leveraging WordPress and AWS S3 for a Robust and Scalable Website

Introduction

In today’s digital age, having a strong online presence is crucial for businesses of all sizes. WordPress, a versatile content management system (CMS), and Amazon S3, a scalable object storage service, offer a powerful combination for building and hosting dynamic websites.

Understanding the Setup

To effectively utilize WordPress and S3, here’s a breakdown of the key components and their roles:

  1. WordPress:
  • Content Management: WordPress provides an intuitive interface for creating and managing website content.
  • Plugin Ecosystem: A vast array of plugins extends WordPress’s functionality, allowing you to add features like SEO, e-commerce, and security.
  • Theme Customization: You can customize the appearance of your website using themes, either by choosing from a wide range of pre-built themes or creating your own. Get it free from the maintainers directly and free: https://wordpress.org/download/
  1. AWS S3:
  • Scalable Storage: S3 offers virtually unlimited storage capacity to accommodate your website’s growing content.
  • High Availability: S3 ensures your website is always accessible by distributing data across multiple servers.
  • Fast Content Delivery: Leveraging AWS CloudFront, a content delivery network (CDN), can significantly improve website performance by caching static assets closer to your users.

The Deployment Process

Here’s a simplified overview of the deployment process:

  1. Local Development:
  • Set up a local WordPress development environment using tools like XAMPP, MAMP, or Docker.
  • Create and test your website locally.
  1. Static Site Generation:
  • Use a tool like WP-CLI or a plugin to generate static HTML files from your WordPress site.
  • This process converts dynamic content into static files, which can be optimized for faster loading times.
  1. S3 Deployment:
  • Upload the generated static files to an S3 bucket.
  • Configure S3 to serve the files directly or through a CloudFront distribution.
  1. CloudFront Distribution:
  • Set up a CloudFront distribution to cache your static assets and deliver them to users from edge locations.
  • Configure custom domain names and SSL certificates for your website.

Benefits of Using WordPress and S3

  • Scalability: Easily handle increased traffic and content without compromising performance.
  • Cost-Effective: S3 offers affordable storage and bandwidth options.
  • High Availability: Ensure your website is always accessible to users.
  • Security: Benefit from AWS’s robust security measures.
  • Flexibility: Customize your website to meet your specific needs.
  • Performance: Optimize your website’s performance with caching and CDN.

Conclusion

By combining the power of WordPress and AWS S3, you can create a robust, scalable, and high-performance website. This setup offers a solid foundation for your online presence, whether you are a small business owner or a large enterprise.

Start your cloud journey for free today with AWS! Sign up now: https://aws.amazon.com/free/

Automating Laptop Charging with AWS: A Smart Solution to Prevent Overheating

In today’s fast-paced digital world, laptops have become indispensable tools. However, excessive charging can lead to overheating, which can significantly impact performance and battery life. In this blog post, we’ll explore a smart solution that leverages AWS services to automate laptop charging, prevent overheating, and optimize battery health. I do agree that Asus does provide premium support for a subscription, but this research and excercise was to brush up my brains and learn to create on aws with some useful solution. The solution is still in concept and once I start using it in production to the full extend, the shell scripts and cloudformation template will be pushed into github handle jthoma repository code-collection/aws

Understanding the Problem:

Overcharging can cause the battery to degrade faster and generate excessive heat. Traditional manual charging methods often lead to inconsistent charging patterns, potentially harming the battery’s lifespan.

The Solution: Automating Laptop Charging with AWS

To address this issue, we’ll utilize a combination of AWS services to create a robust and efficient automated charging system:

  1. AWS IoT Core: Purpose: This service enables secure and reliable bi-directional communication between devices and the cloud.
    How it’s used: We’ll connect a smart power outlet to AWS IoT Core, allowing it to send real-time battery level data to the cloud.
    Link: https://aws.amazon.com/iot-core/
    Getting Started: Sign up for an AWS account and create an IoT Core project.
  2. AWS Lambda: Purpose: This serverless computing service allows you to run code without provisioning or managing servers.
    How it’s used: We’ll create a Lambda function triggered by IoT Core messages. This function will analyze the battery level and determine whether to charge or disconnect the power supply.
    Link: https://aws.amazon.com/lambda/
    Getting Started: Create a Lambda function and write the necessary code in your preferred language (e.g., Python, Node.js, Java).
  3. Amazon DynamoDB: Purpose: This fully managed NoSQL database service offers fast and predictable performance with seamless scalability.
    Link: https://aws.amazon.com/dynamodb/
  4. Amazon CloudWatch: Purpose: This monitoring and logging service helps you collect and analyze system and application performance metrics.
    How it’s used: We’ll use CloudWatch to log system health and generate alarms based on battery level or temperature threshold. Also it helps to monitor the performance of our Lambda functions and IoT Core devices, ensuring optimal system health.
    Link: https://aws.amazon.com/cloudwatch/
    Getting Started: Configure CloudWatch to monitor your AWS resources and set up alarms for critical events.

How it Works:

  1. Data Collection: My Ubuntu system with the help of a shell script uses aws cli to send real-time battery level data to the cloud watch logs.
  2. Data Processing: Cloud watch metric filter alarms will trigger lambda function which is set for appropriate actions.
  3. Action Execution: The Lambda function sends commands to the smart power outlet to control the charging process.
  4. Data Storage: Historical battery level data is stored in Cloud Watch logs for analysis using Athena and further optimization.
  5. Monitoring and Alerting: CloudWatch monitors the system’s health and sends alerts if any issues arise.

Benefits of Automated Charging:

Optimized Battery Health: Prevents overcharging and undercharging, extending battery life.
Reduced Heat Generation: Minimizes thermal stress on the laptop.
Improved Performance: Ensures optimal battery performance, leading to better system responsiveness.
Energy Efficiency: Reduces energy consumption by avoiding unnecessary charging.

Conclusion

By leveraging AWS services, a sophisticated automated charging system that safeguards the laptop’s battery health and enhances its overall performance is reached. This solution empowers you to take control of your device’s charging habits and enjoy a longer-lasting, cooler, and more efficient laptop.

Start Your AWS Journey Today, Signup for free !

Ready to embark on your cloud journey? Sign up for an AWS account and explore the vast possibilities of cloud computing. With AWS, you can build innovative solutions and transform your business.

Amazon Q Developer: A Generative AI-Powered Conversational Assistant for Developers

Amazon Q Developer is a generative artificial intelligence (AI) powered conversational assistant designed to support developers in understanding, building, extending, and managing AWS applications. By leveraging the power of generative AI, Amazon Q Developer can provide developers with a variety of benefits, including:

Enhanced Understanding: Developers can ask questions about AWS architecture, resources, best practices, documentation, support, and more. Amazon Q Developer provides clear and concise answers, helping developers quickly grasp complex concepts.
Accelerated Development: Amazon Q Developer can assist in writing code, suggesting improvements, and automating repetitive tasks. This can significantly boost developer productivity and efficiency.
Improved Code Quality: By identifying potential issues and suggesting optimizations, Amazon Q Developer helps developers write cleaner, more secure, and more reliable code.

Amazon Q Developer is powered by Amazon Bedrock, a fully managed service that provides access to various foundation models (FMs). The model powering Amazon Q Developer has been specifically trained on high-quality AWS content, ensuring developers receive accurate and relevant answers to their questions.

Key Features of Amazon Q Developer:

Conversational Interface: Interact with Amazon Q Developer through a natural language interface, allowing easy and intuitive communication.
Code Generation and Completion: Receive code suggestions and completions as you type, reducing the time spent writing code.
Code Review and Optimization: Identify potential issues in your code and receive recommendations for improvements.
AWS-Specific Knowledge: Access a wealth of information about AWS services, best practices, and troubleshooting tips.
Continuous Learning: Amazon Q Developer is constantly learning and improving, ensuring that you always have access to the latest information.

How to Get Started with Amazon Q Developer:

  1. Sign up for an AWS account: If you don’t already have one, create an AWS account to access Amazon Q Developer.
  2. Install the Amazon Q Developer extension: Download and install the Amazon Q Developer extension for your preferred IDE (e.g., Visual Studio Code).
  3. Start asking questions: Begin interacting with Amazon Q Developer by asking questions about AWS, your code, or specific development tasks.

By leveraging the power of generative AI, Amazon Q Developer empowers developers to work more efficiently, write better code, and accelerate their development process.