Creating a Time-lapse effect Video from a Single Photo Using Command Line Tools on Ubuntu

In this tutorial, I’ll walk you through creating a timelapse effect video that transitions from dark to bright, all from a single high-resolution photo. Using a Samsung Galaxy M14 5G, I captured the original image, then manipulated it using Linux command-line tools like ImageMagick, PHP, and ffmpeg. This approach is perfect for academic purposes or for anyone interested in experimenting with video creation from static images. Here’s how you can achieve this effect. And note that this is just an academic exploration and to be used as a professional tool the values and frames should be defined with utmost care.

Basics was to find the perfect image, and crop it to 9:16 since I was targetting facebook reels and the 50 MP images taken on Samsung Galaxy M14 5G are at 4:3 with 8160×6120 and Facebook reels or YouTube shorts follow the format of 9:16 and 1080×1920 or proportionate dimensions. My final source image was 1700×3022 added here for reference. Had to scale it down to keep inside the blog aesthetics.

Step 1: Preparing the Frame Rate and Length
To begin, I decided on a 20-second video with a frame rate of 25 frames per second, resulting in a total of 500 frames. Manually creating the 500 frames was tedious and any professionals would use some kind of automation. Being a devops enthusiast and a linux fanatic since 1998 my choice was shell scripting. But addiction to php as an aftermath of usage since 2002 kicked up inside me and the following code nippet was the outcome.

Step 2: Generating Brightness and Contrast Values Using PHP
The next step was to create an array of brightness and contrast values to give the impression of a gradually brightening scene. Using PHP, I mapped each frame to an optimal brightness-contrast value. Here’s the PHP snippet I used:

<?php


$dur = 20;
$fps = 25;
$frames = $dur * $fps;
$plen = strlen(''.$frames) + 1;
$val = -50;
$incr = (60 / $frames);

for($i = 0; $i < $frames; $i++){
   $pfx =  str_pad($i, $plen, '0', STR_PAD_LEFT);

    echo $pfx, " ",round($val,2),"\n";

    $val += $incr;
}

?>

Being in ubuntu the above code saved as gen.php and after updating the values for duration and framerate this was executed from the cli and output redirected to a text file values.txt with the following command.

php -q gen.php > values.txt 

Now to make things easy, the source file was copied as src.jpg into a temporary folder and a sub-folder ‘anim’ was created to hold the frames. Here I already had a script which will resume from where left off depending on the situation. the script is as follows.

#!/bin/bash


gdone=$(find ./anim/ -type f | grep -c '.jpg')
tcount=$(grep -c "^0" values.txt)
todo=$(( $tcount - $gdone))

echo "done $gdone of ${tcount}, to do $todo more "

tail -$todo values.txt | while read fnp val 
do 
    echo $fnp
    convert src.jpg -brightness-contrast ${val} anim/img_${fnp}.jpg
done

The process is quite simple, first code line defines a var gdone by counting ‘.jpg’ files in the ‘anim’ sub-directory and then taking total count from values.txt the difference is to be done the status is echoed to output and a loop is initiated with reading the last todo lines from values.txt and executing the conversion using the convert utility of imagemagick. In case this needs to be interrupted, I just close the terminal window from xwindows, as a subsequent execution will continue from where leftoff. Once this is completed, the frames are stitched together using ffmpeg using the following commad.

ffmpeg -i anim/img_%04d.jpg -an -y ../output.mp4

The filename pattern %04d is decided from the width of number of frames plus 1 as in the php code the var $plen on code line 4 is taken for the str_pad function input padd length.

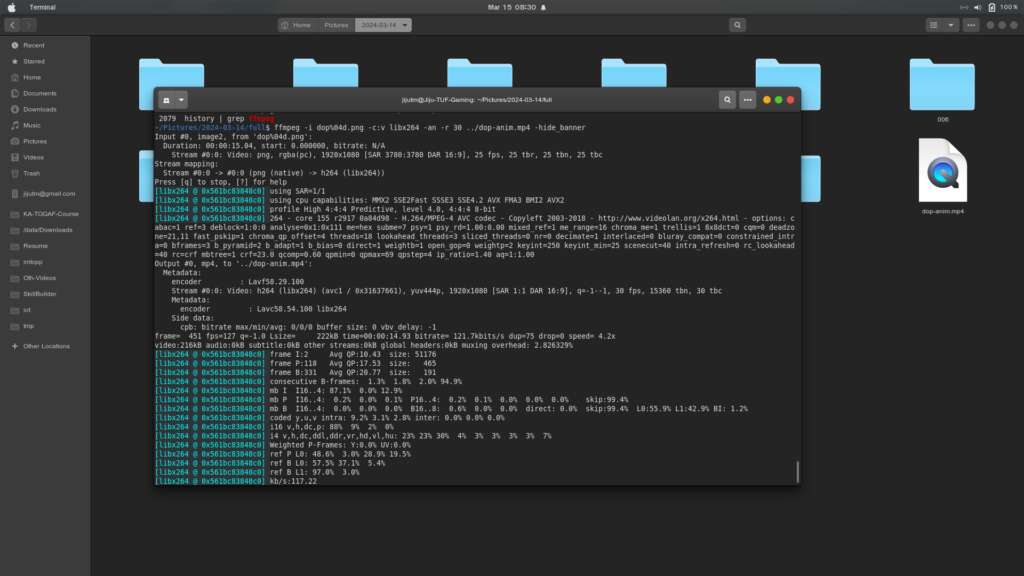
The properties of final output generated by ffmpeg is as follows. Note the dimensions, duration and frame rate do comply as decided on startup.

Leveraging WordPress and AWS S3 for a Robust and Scalable Website

Introduction

In today’s digital age, having a strong online presence is crucial for businesses of all sizes. WordPress, a versatile content management system (CMS), and Amazon S3, a scalable object storage service, offer a powerful combination for building and hosting dynamic websites.

Understanding the Setup

To effectively utilize WordPress and S3, here’s a breakdown of the key components and their roles:

  1. WordPress:
  • Content Management: WordPress provides an intuitive interface for creating and managing website content.
  • Plugin Ecosystem: A vast array of plugins extends WordPress’s functionality, allowing you to add features like SEO, e-commerce, and security.
  • Theme Customization: You can customize the appearance of your website using themes, either by choosing from a wide range of pre-built themes or creating your own. Get it free from the maintainers directly and free: https://wordpress.org/download/
  1. AWS S3:
  • Scalable Storage: S3 offers virtually unlimited storage capacity to accommodate your website’s growing content.
  • High Availability: S3 ensures your website is always accessible by distributing data across multiple servers.
  • Fast Content Delivery: Leveraging AWS CloudFront, a content delivery network (CDN), can significantly improve website performance by caching static assets closer to your users.

The Deployment Process

Here’s a simplified overview of the deployment process:

  1. Local Development:
  • Set up a local WordPress development environment using tools like XAMPP, MAMP, or Docker.
  • Create and test your website locally.
  1. Static Site Generation:
  • Use a tool like WP-CLI or a plugin to generate static HTML files from your WordPress site.
  • This process converts dynamic content into static files, which can be optimized for faster loading times.
  1. S3 Deployment:
  • Upload the generated static files to an S3 bucket.
  • Configure S3 to serve the files directly or through a CloudFront distribution.
  1. CloudFront Distribution:
  • Set up a CloudFront distribution to cache your static assets and deliver them to users from edge locations.
  • Configure custom domain names and SSL certificates for your website.

Benefits of Using WordPress and S3

  • Scalability: Easily handle increased traffic and content without compromising performance.
  • Cost-Effective: S3 offers affordable storage and bandwidth options.
  • High Availability: Ensure your website is always accessible to users.
  • Security: Benefit from AWS’s robust security measures.
  • Flexibility: Customize your website to meet your specific needs.
  • Performance: Optimize your website’s performance with caching and CDN.

Conclusion

By combining the power of WordPress and AWS S3, you can create a robust, scalable, and high-performance website. This setup offers a solid foundation for your online presence, whether you are a small business owner or a large enterprise.

Start your cloud journey for free today with AWS! Sign up now: https://aws.amazon.com/free/

Exploring Animation Creation with GIMP, Bash, and FFmpeg: A Journey into Headphone Speaker Testing

For a long time, I had a desire to create a video that helps people confirm that their headphones are worn correctly, especially when there are no left or right indicators. While similar solutions exist out there, I decided to take this on as an exploration of my own, using tools I’m already familiar with: GIMP, bash, and FFmpeg.

This project resulted in a short animation that visually shows which speaker—left, right, or both—is active, syncing perfectly with the narration.

Project Overview:
The goal of the video was simple: create an easy way for users to verify if their headphones are worn correctly. The animation features:

  • “Hear on both speakers”: Animation shows pulsations on both sides.
  • “Hear on left speaker only”: Pulsations only on the left.
  • “Hear on right speaker only”: Pulsations only on the right.
  • Silence: No pulsations at all. Tools Used:
  • Amazon Polly for generating text-to-speech narration.
  • Audacity for audio channel switching.
  • GIMP for creating visual frames of the animation.
  • Bash scripting to automate the creation of animation sequences.
  • FFmpeg to compile the frames into the final video.
  • LibreOffice Calc to calculate frame sequences for precise animation timing. Step-by-Step Workflow:
  1. Creating the Audio Narration:
    Using Amazon Polly, I generated a text-to-speech audio file with the necessary instructions. Polly’s lifelike voice makes it easy to understand. I then used Audacity to modify the audio channels, ensuring that the left, right, and both channels played at the appropriate times.
  2. Synchronizing Audio and Visuals:
    I needed the animation to sync perfectly with the audio. To achieve this, I first identified the start and end of each segment in the audio file and created a spreadsheet in LibreOffice Calc. This helped me calculate the number of frames per segment, ensuring precise timing for the animation.
  3. Creating Animation Frames in GIMP:
    The visual animation was created using a simple diaphragm depression effect. I made three frames in GIMP:
  • One for both speakers pulsating,
  • One for the left speaker only,
  • One for the right speaker only.
  1. Automation with Bash:
    Once the frames were ready, I created a guideline text using Gedit that outlined the sequence. I then used a bash while-read loop combined with a seq loop to generate 185 image files. These files followed a naming convention of anim_%03d.png, ensuring they were easy to compile later.
  2. Compiling with FFmpeg:
    After all frames were created, I used FFmpeg to compile the images into the final video. The result was a fluid, synchronized animation that matched the audio perfectly. The Finished Product:
    Here’s the final video that demonstrates the headphone speaker test:

https://youtu.be/_fskGicSSUQ

Why I Chose These Tools:
Being familiar with xUbuntu, I naturally gravitated toward tools that work seamlessly in this environment. Amazon Polly provided high-quality text-to-speech output, while Audacity handled the channel switching with ease. GIMP was my go-to for frame creation, and the combination of bash and FFmpeg made the entire animation process efficient and automated.

This project not only satisfied a long-held desire but also served as an exciting challenge to combine these powerful tools into one cohesive workflow. It was a satisfying dive into animation and audio synchronization, and I hope it can help others as well!

Conclusion:
If you’re into creating animated videos or simply exploring new ways to automate your creative projects, I highly recommend diving into tools like GIMP, bash, and FFmpeg. Whether you’re on xUbuntu like me or another system, the potential for customization is vast. Let me know if you found this helpful or if you have any questions!

OpenShift On-Premises vs. AWS OKS and ROSA: A Comparative Analysis

The choice between OpenShift on-premises, Amazon Elastic Kubernetes Service (EKS), and Red Hat OpenShift Service on AWS (ROSA) is a critical decision for organizations seeking to leverage the power of Kubernetes. This article delves into the key differences and advantages of these platforms.

Understanding the Contenders

  • OpenShift on-Premises: This is a self-managed Kubernetes platform that provides a comprehensive set of tools for building, deploying, and managing containerized applications on-premises infrastructure.
  • Amazon Elastic Kubernetes Service (EKS): A fully managed Kubernetes service that allows users to run and scale Kubernetes applications without managing Kubernetes control plane or worker nodes.
  • Red Hat OpenShift Service on AWS (ROSA): A fully managed OpenShift service on AWS, combining the strengths of OpenShift and AWS for a seamless cloud-native experience.

Core Differences

Advantages of AWS Offerings

While OpenShift on-premises offers granular control, AWS EKS and ROSA provide significant advantages in terms of scalability, cost-efficiency, and time-to-market.


Scalability and Flexibility

  • Elastic scaling: EKS and ROSA effortlessly scale resources up or down based on demand, ensuring optimal performance and cost-efficiency.
  • Global reach: AWS offers a vast global infrastructure, allowing for seamless deployment and management of applications across multiple regions.
  • Hybrid and multi-cloud capabilities: Both EKS and ROSA support hybrid and multi-cloud environments, enabling organizations to leverage the best of both worlds.

Cost-Efficiency

  • Pay-as-you-go pricing: EKS and ROSA eliminate the need for upfront infrastructure investments, allowing organizations to optimize costs based on usage.
  • Cost optimization tools: AWS provides a suite of tools to help manage and reduce cloud spending.
  • Spot instances: EKS supports spot instances, offering significant cost savings for non-critical workloads.

Time-to-Market

  • Faster deployment: EKS and ROSA provide pre-configured environments and automated provisioning, accelerating application deployment.
  • Focus on application development: By offloading infrastructure management, teams can concentrate on building and innovating.
  • Continuous integration and delivery (CI/CD): AWS offers robust CI/CD tools and services that integrate seamlessly with EKS and ROSA.

Security and Compliance

  • Robust security: AWS is known for its strong security posture, offering a comprehensive set of security features and compliance certifications.
  • Regular updates: EKS and ROSA benefit from automatic updates and patches, reducing the risk of vulnerabilities.
  • Compliance frameworks: Both platforms support various compliance frameworks, such as HIPAA, PCI DSS, and SOC 2.

Conclusion

While OpenShift on-premises offers control and customization, AWS EKS and ROSA provide compelling advantages in terms of scalability, cost-efficiency, time-to-market, and security. By leveraging the power of the AWS cloud, organizations can accelerate their digital transformation and focus on delivering innovative applications.

Note: This article provides a general overview and may not cover all aspects of the platforms. It is essential to conduct a thorough evaluation based on specific organizational requirements and constraints.

Attempt to create animated representation of AWS DevOps pipeline

Though the title says something technical this is just a self-promotion and cheap boasting

Continuing with the boosting as I have been doing this for the past couple of days. No, I am not insane, but wanted to do this by hand and use some shell commands. Initially the scenes were identified as 10 and folders created with a base flowchart made using Libre Office Draw copied into each of the folders.

Finally the full image sequence was copied into “full” with renaming in sequence with the following command.

Before that, the same command was previewed using echo instead of cp as seen below.

And finally all images were in the “full” folder as below.

It was time to invoke ffmpeg as shown below.

ffmpeg -i dop%04d.png -c:v libx264 -an -r 30 ../dop-anim.mp4 -hide_banner

What could have been achieved with paid tools like Canva or many others, with some effort and free tools available with Ubuntu Linux achieved with minimal expense, without considering my work time earnings that should be a concern.

Complete Managed Development Environment on AWS

Amazon CodeCatalyst, a Unified Software Development Service it was only a few days back that I suggested about Run your Development Environment on Cloud, and as though our dear fellows at AWS had heard my thoughts the preview of Amazon CodeCatalyst was announced two days back as of this post.

As we go through the explanation and blog post we find that it is really intriguing and exciting to hear about the features. Well, I did give a run through the preview and I found that this could change the way we work. At least it did change the way I worked but not for the full-time job as that would violate the compliance complications. But mostly this would be used by me for my leisure time and commitments towards FOSS and my GitHub presence.

Project templates – or blueprints as they define the term do help in fast-tracking the initial development phase and creating a boilerplate to start working. On-demand development environment hosted on the AWS cloud, automated ci-cd pipelines with a multitude of options and drag and drop building, browser-based ide cloud9 with terminal access on the development instance running amazon linux2 which is based out of centos, invite collaborators across the globe to inspect your code with just a few clicks are just a few of the facilities of this unified development environment as service.

I am still very much excited to dig into this service and will go further into this and maybe come out with more like a session with the awsugtvm very soon as time and health permits. Last month I was bedridden after a bike accident involving a stray dog.

Refactored a Complicated Lambda to use Layers and split it up

Till recently, in fact, till last week, was not too worried about writing all code into single code folder, and mapping multiple AWS::Serverless::Function into individual named handlers. Till I stumbled on this article, where I started wondering how my folder structure and sam templates were going into the stack. A detailed inspection was not required, though this was the time when I used the GUI ( after a long time ). But the outcome showed how pathetic the condition was.

The lambda console with the filter “aws:cloudformation:stack-name: <stack>”

Well, it is clear that the whole mess is being uploaded into all the function code. What does this mean – holy grail, any one small change here or there, would update all the functions – last modified is the same, all functions will have the node_modules and other artifacts like templates and custom modules.

Continue reading “Refactored a Complicated Lambda to use Layers and split it up”

Anything with Cloudformation

As part of the DevOps Masters Program on Simplilearn, had to configure a jenkins pipeline. For the same, even though they do provide a lab environment, I feel at home with AWS and cli. I myself being part of the AWS Community Builders, should normally prefer this approach.

For the particular project, the infrastructure was visualized by me as two AWS::EC2 pre deployed one for Jenkins master node, and the other for java+tomcat to deploy a sample app. The Jenkins would be configured with Cloud Plugin configured to manage EC2 nodes for build and test and finally deploy to the tomcat using remote deployment using war. Making the long story short lets jump straight into the steps. Agree that I completed the Project Run in about a couple of hours and creating such a template and running through aws-sam was purely on academic interest. Download the template file: cf-template-ec2-jenkins-tomcat-ubuntu-bionic.yaml

Continue reading “Anything with Cloudformation”

Wild walk with #sam and #aws

Mostly these days, I am working with IaC using aws sam cli which gives me a kind of satisfaction – its cumbersome for me to go into the myriad of web gui and continuously clicking. By creating templates and running them from cli has been my choice for too long.

Getting straight into the job, will summarize the initial requirements and the architecture, then move on to additions.

Required Output

Host a Static Site on S3, deliver it globally through Cloud Front CDN with SSL over HTTPS. Once deployed the Route53 tables should be updated. The deployment should use aws sam cli and IaC.

Though there is not much complication in the architecture, while deploying this during the first pandemic wave, after multiple attempts I found that the cloudfront should be created in specific region such that the SSL certificate can be attached.

Continue reading “Wild walk with #sam and #aws”

WordPress to Static – Pushing the limits

Well this is not a kind of DIY or hands-on, but just a note on how I am doing it. The architecture of this portal.

The process is as follows

  1. Write an email with the subject having title and a signature, checksum of title plus a predefined string, separated by a double semicolon
  2. Send the same to a virtual id on CloudMailin.
  3. That is routed to an API Gateway, which triggers a lambda.
  4. Lambda (Node.js) evaluates the signature.
  5. If signature is valid, write email json into s3 bucket and triggers an EC2 spot instance with an EBS Volume attached.
  6. The user-data is injected with startup and delayed startup to pick and post the article from S3 into the WordPress on EBS
  7. Inline images are stripped and uploaded into the media manager, and links are replaced appropriately.
  8. Custom scripts utilizing mirror-website and other cli tools will convert the www.jijutm.com website to a static site
  9. WordPress has S3 support for Media Manager through a plugin.
  10. Downloads are directly uploaded into a download bucket.
  11. Then site is synced to s3 with proper expiry headers
  12. CloudFront is invalidated using the aws cli command.
  13. The services are stopped internally and EBS is unmounted
  14. Finally, the EC2 instance is terminated.

The EBS volume was prepared with the data, html and server configuration files. The spot instance is created from a custom ami which is updated time to time and provided to the lambda through environment variables.

This will run for me since I am the sole author of this blog, and my frequency of posting is very low hardly once in two months. For a high frequently updated portal or blog, this process may even fail totally and if there are more than one author, don’t even think of this. I do agree that there are too many cons, like preview editing, making changes etc are not there. But the most important part for me is this WordPress blog is rock solid, Not Hackable, unless AWS S3 or CloudFront is Hacked. Also page load times are pretty good, though tools like google lighthouse or webpage test are still suggesting more improvements.